
Taking out a car stereo can feel intimidating, especially if you’re not used to working with car interiors or electronics. But with the right steps and tools, it’s something that most people can do themselves. Whether you’re upgrading your sound system, fixing wiring problems, or just want to clean behind the dash, removing your car stereo is a practical skill. This guide walks you through the process safely and clearly, with advice to avoid mistakes and examples to help you understand what to expect.
Why Remove A Car Stereo?
People take out car stereos for many reasons. Some want to install a new model with better features like Bluetooth or navigation. Others need access to wiring or want to diagnose audio problems. Sometimes, a stereo must be removed to reach hidden screws or parts during dashboard repairs. Knowing how to do it properly can save money and prevent accidental damage.
Preparing To Remove Your Car Stereo
Before you start, preparation is key. You’ll need to gather the right tools and make sure the car is safe to work on. Here’s what you should check:
- Tools Needed
- Screwdrivers (Phillips and flathead)
- Panel removal tool (plastic pry tool)
- Stereo removal keys (for factory radios)
- Socket wrench (usually 8mm or 10mm)
- Needle-nose pliers
- Flashlight
- Safety Steps
- Park your car on a flat surface.
- Turn off the engine and remove the key.
- Disconnect the negative battery terminal to avoid electrical shock or short circuits.
- Check Your Stereo Type
- Factory stereos often need special removal tools.
- Aftermarket stereos usually use screws or bolts.
Pro Tip: Take photos as you go, especially of wire connections. This helps you reconnect everything correctly later.
Understanding Car Stereo Mounting Systems
Car stereos are mounted in different ways, and knowing which one you have affects how you remove it. Here are the main types:
| Mounting Type | Common Features | Removal Difficulty |
|---|---|---|
| Single DIN | Standard size, usually with metal sleeve | Easy |
| Double DIN | Larger, often with touchscreens | Moderate |
| OEM Factory | Integrated design, special clips | Hard |
Non-obvious insight: Some factory stereos have hidden screws behind air vents or under trim panels. Always check your owner’s manual or search online for your specific model.
Step-by-step Guide: How To Take Out A Car Stereo
Every car is slightly different, but most follow these general steps:
Step 1: Remove Dashboard Panels
Use a plastic panel removal tool to gently pry off the dashboard panels around the stereo. Start at the edges and work slowly to avoid breaking clips. Some panels require you to remove screws first; look for them under cup holders or inside glove compartments.
Common mistake: Using metal tools can scratch or crack dashboard plastics. Stick to plastic tools and be patient.
Step 2: Unscrew Or Unclip The Stereo
Once the panels are off, locate the screws or clips holding the stereo in place.
- For aftermarket stereos, you usually find 2-4 screws around the stereo face.
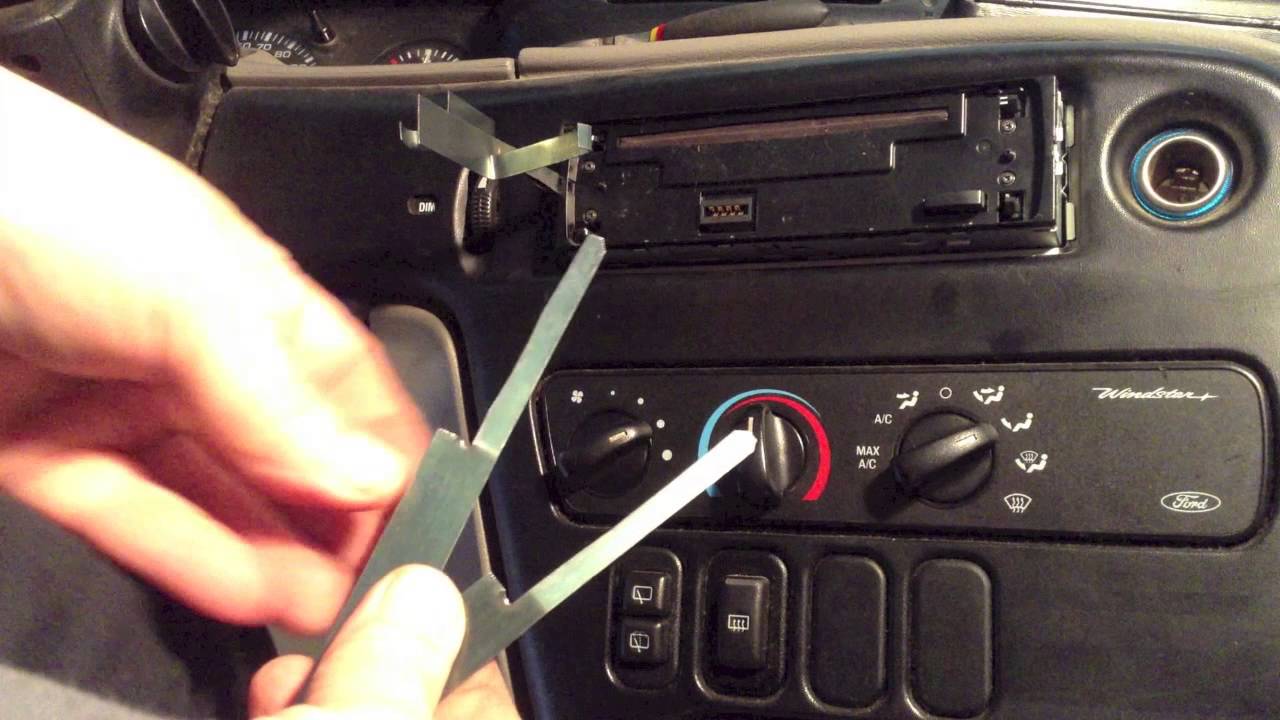
- For factory stereos, insert removal keys into the slots on the front. Push until you hear a click, then gently pull.
If you have a double DIN unit, there may be bolts at the sides or behind the unit. Use your flashlight to check.
Step 3: Pull Out The Stereo
Carefully pull the stereo towards you. If it resists, check for extra screws or clips you missed. Never force it—something could break.
Non-obvious insight: When you pull out the stereo, wires may be short or tightly bundled. Rest the stereo on a towel on the dashboard instead of letting it hang.
Step 4: Disconnect Wiring And Antenna
Behind the stereo, you’ll see several connectors:
- Power and speaker plugs
- Antenna cable
- Auxiliary or steering wheel control wires (if equipped)
Unplug each connector by pressing the tab or gently wiggling. Don’t pull on the wires themselves—grab the plastic connector.
Step 5: Remove Mounting Sleeve (if Needed)
If you’re removing an aftermarket stereo, there may be a metal mounting sleeve left behind. To get it out:
- Bend back the metal tabs inside the sleeve.
- Slide the sleeve out carefully.
Some sleeves are tight; use pliers if needed, but avoid bending the dash.

Credit: www.wikihow.com
Practical Tips For A Smooth Removal
- Keep screws and clips organized. Use a small container or magnetic tray so nothing gets lost.
- Label wires. If your stereo has many connections, use masking tape and write labels.
- Check for airbags. Some cars have dashboard airbags. Don’t pry near airbag covers.
- Search for hidden fasteners. If the stereo won’t budge, check for screws under panels, behind vents, or in glove boxes.
Comparison: Factory Vs. Aftermarket Stereo Removal
Understanding how removal differs between factory and aftermarket units helps you avoid mistakes.
| Feature | Factory Stereo | Aftermarket Stereo |
|---|---|---|
| Removal Tools | Special keys needed | Screwdrivers and panel tools |
| Number of Screws | Often hidden, varies | Usually visible, 2–4 |
| Wiring Complexity | More connectors | Standard harness |
| Risk of Damage | Higher, integrated panels | Lower, modular parts |
Pro Tip: If you’re unsure about the removal process, check forums or guides specific to your car model. Many car communities share step-by-step photos.
What To Do After Removing Your Car Stereo
Once the stereo is out, you have a few choices:
- Install a new stereo: Make sure the new unit fits the dash and uses the right wiring harness.
- Repair wiring: If you found damaged wires, now is the best time to fix them.
- Clean the dash area: Dust and dirt often collect behind the stereo. Use a soft cloth.
If you’re not installing a new stereo right away, cover the opening to keep dust out and avoid losing screws.
Common Challenges And Solutions
Removing a car stereo doesn’t always go smoothly. Here are some problems people face and how to fix them:
- Stuck Panels: If panels don’t come off, check for hidden screws or bolts. Sometimes, pushing from behind helps.
- Broken Clips: Plastic clips are fragile. If one breaks, you can buy replacements at auto parts stores.
- Tangled Wiring: Take your time unplugging wires. Use needle-nose pliers for tight spots.
- Missing Removal Keys: If you lost your stereo removal keys, you can buy them online or use thin metal strips as a substitute.
Statistics: According to a survey by Crutchfield, about 62% of car owners who tried stereo removal for the first time reported it was easier than expected, especially with good preparation.
How To Avoid Electrical Problems
Disconnecting the battery before you start is essential, but you also need to be careful with wiring.
- Don’t let wires touch. If wires touch each other or metal, they can short out.
- Check fuses. If your stereo doesn’t work after reinstallation, check the fuse box for blown fuses.
- Secure loose wires. Use zip ties to keep wires tidy and prevent pinching during reinstallation.
Non-obvious insight: Modern cars sometimes have anti-theft codes for radios. If you remove your factory stereo, you might need to enter a code to use it again. Check your manual or dealer for this code.
Data: Popular Car Stereo Types In The Us
Here’s a quick look at common stereo types found in US cars:
| Stereo Type | % of Cars (2023) | Main Features |
|---|---|---|
| Factory Single DIN | 22% | CD, radio, basic controls |
| Factory Double DIN | 35% | Touchscreen, navigation |
| Aftermarket Single DIN | 18% | Bluetooth, USB, compact |
| Aftermarket Double DIN | 25% | Advanced features, large display |
Credit: www.youtube.com
When To Call A Professional
While most people can remove a car stereo themselves, some situations require expert help:
- Luxury cars with complex dashboards
- Advanced alarm systems connected to the stereo
- Integrated climate controls or navigation screens
If you’re unsure, a professional installer can do the job quickly and safely. Many shops offer removal as part of installation services.
Useful Resources
For detailed guides and tips, check out Crutchfield’s Car Stereo Installation Guide. It covers different car models and includes photos for extra clarity.
Credit: www.reddit.com
Frequently Asked Questions
How Long Does It Take To Remove A Car Stereo?
Most removals take 30–60 minutes. Simple systems are faster, but factory units with complex panels may take longer.
Can I Remove The Stereo Without Disconnecting The Battery?
It’s not recommended. Always disconnect the battery first to prevent electrical shock or damage.
What If My Stereo Needs A Code After Reinstalling?
Some factory stereos require an anti-theft code. Check your owner’s manual or contact the dealership for the code.
Do I Need Special Tools For Every Car?
Many cars use standard tools, but some factory stereos need special removal keys. Check your car’s manual or online guides.
What Should I Do With The Old Stereo?
You can sell, recycle, or keep your old stereo as a backup. Don’t throw it away—many parts can be reused or sold.
Taking out a car stereo is a useful skill that can save you money and give you more control over your car’s audio system. With careful preparation, the right tools, and patience, most people can do it safely and successfully.
If you ever feel uncertain, seeking professional help is always a smart choice.

Leave a Reply