
You pull out of the driveway, crank up your favorite playlist, and instead of crisp sound, you hear it—a high-pitched whine that rises and falls with your engine's RPM. That buzzing, screeching noise is alternator whine, and it's one of the most common frustrations in car audio. It can make a premium sound system sound like a cheap AM radio from the 1970s.
The good news? Alternator whine is almost always fixable, and in most cases, you can solve it yourself in an afternoon with basic tools. You don't need to be an electrical engineer or spend hundreds at a shop. You just need to understand what causes the noise and work through the fixes systematically. For more on this, see our guide on how to fix car stereo no sound issue.
This guide walks you through everything you need to know: what alternator whine is, how to diagnose it, step-by-step fixes ranked from easiest to most involved, and how to prevent it from happening in future installations. By the end, you'll have the knowledge to eliminate that annoying whine for good.
What Is Alternator Whine?
Alternator whine is a high-pitched, buzzing sound that comes through your car's speakers when the engine is running. Its pitch changes with engine speed—rev the engine and the whine gets higher; let it idle and the pitch drops. This distinctive behavior is the key identifier.
The noise comes from your alternator, which generates electricity to charge the battery and power your car's electrical systems. The alternator produces DC power, but it doesn't do so perfectly cleanly. The electrical output contains ripple and noise that can bleed into your audio system's wiring and get amplified through your speakers.
This isn't just a cosmetic issue. While alternator whine won't damage your speakers or stereo, it's a warning sign that something in your car's electrical system or audio installation isn't right. Left unchecked, the underlying cause—like a poor ground or failing alternator—could lead to bigger problems down the road.
Common Symptoms
- A whine or buzz that changes pitch with engine RPM
- Noise that only appears when the engine is running
- Sound coming from some or all speakers
- Whine that disappears when you turn the stereo off or run the engine at a steady speed
Not every noise is alternator whine. Static, popping, or crackling sounds often point to different issues, like damaged speaker wires or loose connections. Understanding the difference saves you from chasing the wrong problem.
Why Does Alternator Whine Happen?
Alternator whine happens because electrical noise from the alternator finds its way into your audio signal path. Think of it like a leak in a water pipe—the noise is the water, and there's always a route it takes to get where it shouldn't. Here are the most common culprits:
Ground Loop Problems
A ground loop is the single most common cause of alternator whine. It occurs when your stereo components connect to the car's chassis at different points, creating multiple paths for electrical current to flow. These different ground points have slightly different voltage levels, and current flows between them, carrying noise into your audio signal.
Poor Wiring Practices
How you route your cables matters enormously. Running power cables alongside audio cables, especially RCA cables, allows the electrical field from the power wires to induce noise into the audio signal. This is called electromagnetic interference, and it's a classic rookie mistake.
Damaged or Low-Quality Cables
Cheap RCA cables often have inadequate shielding. Over time, cables can also develop breaks, corrosion, or damage that compromises their shielding. Without proper shielding, cables act like antennas, picking up all sorts of electrical noise.
Bad Connections
Loose, corroded, or oxidized connections create resistance. Resistance in power or ground circuits generates heat and voltage drops, which can introduce noise into the system. A connection that looks fine can still be a hidden problem.
Failing Alternator
As alternators age, their internal components can wear, producing more electrical noise than they did when new. Worn brushes, bearing issues, or failing diodes all contribute to noisier output. This is less common but worth checking if other fixes don't resolve the issue.
How Alternator Whine Travels
The noise enters your audio system through several paths. The most common routes are RCA cables picking up interference, power wires carrying noise into your head unit or amplifier, and ground circuits allowing noise to flow between components. Understanding these paths helps you target your fixes effectively.
Diagnosing Alternator Whine
Before you start swapping parts, take time to diagnose the problem properly. A systematic approach saves time and money. Here's a practical, step-by-step process:
Step 1: Listen Carefully
Start your engine and turn on the stereo. Note exactly what you hear and when:
- Does the pitch change when you rev the engine?
- Is the whine louder through certain speakers?
- Does it disappear when you turn the stereo off?
- Is the noise present with the engine off but the stereo on?
If the whine tracks with engine RPM and disappears when the stereo is off, you're dealing with alternator whine.
Step 2: Check Your Grounds
Bad grounds cause the majority of alternator whine cases. Check:
- Whether ground wires attach to clean, bare metal (not painted surfaces)
- If all audio components share a single ground point
- For rust, corrosion, or loose connections on ground wires
- Whether ground wire gauge matches the power wire gauge
Step 3: Inspect Cable Routing
Look at how your cables run through the car:
- Are power cables and RCA cables running side by side?
- Do any cables cross at sharp angles?
- Are there any damaged, pinched, or frayed cables?
- Are connections tight and clean at every point?
Step 4: Isolate Components
Systematically disconnect components to narrow down the source. Unplug the amplifier from the head unit. If the whine stops, the problem is in the signal path. If it continues, the noise may be coming from the head unit itself or its power supply.
Step 5: Use a Multimeter
A digital multimeter is invaluable for diagnosing electrical issues. Set it to DC voltage and measure between the ground point of your head unit and the ground point of your amplifier. A difference of more than 0.1 volts indicates a ground loop.

A multimeter measuring voltage differences between ground points is a reliable way to confirm a ground loop.
Practical Example
A common scenario: you install a new amplifier and immediately hear whine through all speakers. You check the ground wire and find it's bolted to a painted surface in the trunk. The paint acts as an insulator, breaking the electrical connection. Scraping the paint off and securing the wire directly to bare metal instantly eliminates the whine.
Quick Fixes: 5 Things to Try First
Before diving into complex solutions, try these five quick fixes. They solve the majority of alternator whine cases and take minimal time.
- Clean and re-secure all ground connections — Scrape away paint, rust, and corrosion. Use a star washer under the bolt to bite into the metal.
- Shorten ground wires — Long ground wires add resistance. Keep them under 18 inches whenever possible.
- Separate power and audio cables — Move them to opposite sides of the car. If they must cross, do it at a 90-degree angle.
- Tighten all connections — Check every power, ground, and speaker connection. Loose connections cause all sorts of noise.
- Test with the engine off — If the whine disappears when the engine is off, you've confirmed it's alternator-related.
One tip that many people overlook: check your fuse holders. A loose fuse or a fuse holder with poor contact can introduce noise into the system. Tighten everything and see if that helps.
How To Fix Alternator Whine: Step-by-Step Solutions
If the quick fixes don't resolve the issue, work through these solutions in order. They range from simple to more involved, and most people find their solution in the first few steps.
1. Improve Ground Connections
Proper grounding is the single most important fix for alternator whine. The ground wire provides a return path for electrical current, and if that path is compromised, noise enters the system.
How to do it right:
- Use a single ground point for all audio components. Having everything ground at the same spot eliminates voltage differences between components.
- Attach ground wires to bare metal. Scrape away paint, rust, and corrosion until you see shiny metal.
- Use ground wires at least as thick as your power wires. An 8-gauge power wire needs an 8-gauge ground.
- Keep ground wires short. A length of 12-18 inches is ideal.
- Use a star washer under the bolt to ensure good metal-to-metal contact.
A common mistake is attaching a ground wire to a seat bolt or seat belt anchor. These bolts often have thread-locking compound or paint, which breaks the connection. Find a bolt that goes directly into the car's structural metal.
2. Separate Power and Audio Cables
Electromagnetic interference from power cables is another major cause of whine. The electrical field around a power cable can induce noise into nearby audio cables.
Proper cable routing:
- Run power cables along one side of the car (usually the driver's side) and RCA cables along the other side.
- Keep at least 18 inches of separation between power and audio cables.
- If cables must cross, do so at a 90-degree angle. This minimizes the interference zone.
- Avoid running cables parallel to each other for long distances.
Proper cable separation—power on one side, signal on the other—prevents electromagnetic interference.
3. Replace or Shield RCA Cables
If your RCA cables are old, damaged, or low quality, they may be picking up interference. High-quality shielded cables block electromagnetic noise far better than cheap ones.
What to look for:
- Twisted-pair construction with foil or braided shielding
- Thicker insulation and high-quality connectors
- Molded connectors that resist corrosion
If you can't replace the cables immediately, try wrapping them in aluminum foil and grounding the foil. It's a temporary hack, but it works in a pinch.
To learn more about picking the right audio gear and accessories for your car, check out some useful buying tips on MotorRankings.
4. Install a Ground Loop Isolator
A ground loop isolator is a small device that plugs into your RCA cables between the head unit and amplifier. It breaks the electrical loop that causes noise while passing the audio signal through.
Pros:
- Easy to install—literally plug and play
- Inexpensive (typically $15-30)
- Effective for many ground loop issues
Cons:
- May slightly reduce audio quality
- Doesn't fix the underlying problem
- Can sometimes introduce a slight hum on its own
A ground loop isolator is a good temporary fix, but it's better to find and fix the root cause. That way you get clean sound without sacrificing quality.
5. Add a Noise Filter
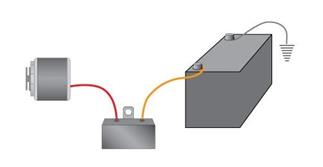
A DC noise filter installs inline with the power supply to your head unit or amplifier. It filters out the electrical noise from the alternator before it reaches your audio components.
Installation basics:
- Connect between the power source and the component
- Follow the manufacturer's wiring diagram
- Mount it in a dry, accessible location
Noise filters work well, but they're a band-aid. If you're installing one because of poor grounding, fix the ground first and you may not need the filter.
6. Check the Alternator
If you've tried everything else and still hear whine, the alternator itself may be the problem. A failing alternator produces more electrical noise than one in good condition.
Signs your alternator may be failing:
- Dimming headlights at idle
- Battery that keeps dying
- Whine that's present even with a good ground and proper cable routing
Have your alternator tested at an auto parts store or by a mechanic. Most can test it in a few minutes for free. If it's failing, replacing it solves the whine and prevents more serious electrical problems down the road.
7. Upgrade Audio Components
Low-quality head units, amplifiers, and speakers often have poor shielding and inferior power supplies. They're more susceptible to picking up electrical noise.
If you're using budget components and have persistent whine, consider upgrading. Look for components specifically designed for noise rejection. Brands like Alpine, Kenwood, and JL Audio engineer their products to minimize interference.
This is the most expensive fix, so try everything else first. But if you're planning an upgrade anyway, choosing components with good noise rejection saves you headaches later.
Advanced Solutions for Persistent Alternator Whine
For those stubborn cases that resist the standard fixes, a few advanced solutions exist. These require more effort and skill, but they can solve the problem for good.
Upgrade the Battery and Charging System
A weak battery or charging system can worsen alternator whine. The alternator works harder to charge a weak battery, producing more electrical noise in the process.
Consider:
- Upgrading to an AGM battery, which handles voltage fluctuations better
- Installing a higher-output alternator if you're running a large audio system
- Adding a capacitor to smooth power delivery to your amplifier
These upgrades help large audio systems run more efficiently and reduce electrical stress on the alternator.
Install Shielding Around Sensitive Components
In rare cases, electromagnetic interference from other car systems can cause whine. Wrapping sensitive audio components or wire runs in shielding material can block this interference.
How to do it:
- Use adhesive copper tape or aluminum shielding
- Wrap RCA cables or sensitive wires
- Ground the shielding to the chassis
This is a niche solution, but it works for cars with unusual electrical interference issues.
Professional Rewiring
If your car's wiring is old, damaged, or poorly installed, a professional rewiring may be the answer. An experienced car audio installer can:
- Replace aging wiring with high-grade cables
- Properly route all cables
- Install clean, reliable connections
- Diagnose issues you might have missed
Professional help costs more, but it's worth it for complex systems or persistent problems. Many shops offer a flat fee for noise diagnosis, and you can decide whether to proceed with repairs.
DIY vs. Professional Fix: Which Is Right for You?
Most alternator whine cases are fixable at home with basic tools and patience. But it's worth knowing when to call in a professional.
| Option | Cost | Time Required | Success Rate | Skill Needed |
|---|---|---|---|---|
| DIY | $10-100 (parts) | 2-4 hours | High (if careful) | Basic wiring skills |
| Professional | $100-500 | 1 day | Very high | None |
Try DIY if:
- You're comfortable with basic wiring
- You can identify the likely cause (usually grounding)
- You have time to work through the steps methodically
Call a professional if:
- You've tried multiple fixes without success
- You're not confident working with car electrical systems
- Your car has complex wiring or multiple audio components
Remember that a professional has specialized tools like oscilloscopes and experience diagnosing unusual cases. Sometimes the extra cost is worth the certainty.
How to Prevent Alternator Whine in New Installations
Prevention is far easier than fixing a problem after it appears. If you're installing a new stereo or adding components, follow these guidelines from the start.
Plan Your Wiring
Before you run a single cable, plan the route. Map out where power cables, audio cables, and speaker wires will go. Keep power and audio on opposite sides of the car from the beginning.
Choose Quality Components
Invest in good cables and components from the start. Cheap RCA cables and poorly shielded head units cause problems that you'll chase for months. Quality doesn't have to cost a fortune, but it's worth spending a little more for reliability.
Test Grounds Before Securing
When you attach a ground wire, test it before you bolt everything down. Use a multimeter to check for continuity between the ground point and the negative battery terminal. If there's any resistance, find a better ground point.
Double-Check Every Connection
Loose connections are the enemy. After installation, go back and check every power, ground, and speaker connection. Give each one a gentle tug to make sure it's solid.
Keep Cables Short
Longer cables have more resistance and pick up more interference. Use the shortest cable runs that reach properly. This is especially true for RCA cables, where longer runs can degrade signal quality.
For more advice on keeping your car's interior clean and organized, including tips on maintaining your seats, check out cleaning under car seats.
Real-World Example: Fixing a 2020 Sedan
Let's walk through a typical scenario to see how all these steps come together.
A driver installs a new amplifier and subwoofer in their 2020 sedan. As soon as they fire up the engine, they hear a whine that rises with RPM.
Step 1: Listen. The whine tracks with engine speed, confirming it's alternator-related.
Step 2: Check grounds. The ground wire is bolted to a painted surface in the trunk. The paint is preventing a solid connection.
Step 3: Fix the ground. The driver scrapes away the paint, exposes bare metal, and attaches the ground wire with a star washer.
Step 4: Check cable routing. The power cable and RCA cable run side by side under the trim. The driver moves the RCA cable to the other side of the car.
Step 5: Test. The whine is gone. The driver confirms the fix works at idle and under acceleration.
This example shows how quickly a proper diagnosis and targeted fixes can solve the problem. Most cases resolve in under an hour once you know what to look for.
Practical Tips for a Quiet Stereo
Beyond the main fixes, here are some tips that often get overlooked:
- Check your fuse holders — Loose fuse holders can cause noise. Tighten them securely.
- Inspect speaker wire routing — Speaker wires running near power wires can pick up interference. Keep them separated.
- Test with the engine off — If whine disappears with the engine off, you've confirmed it's alternator-related.
- Use short cables — The longer the cable, the more noise it can pick up. Keep runs as short as practical.
- Check your antenna — A poorly grounded antenna can introduce noise into the head unit.
Frequently Asked Questions
What causes alternator whine in car stereo systems?
Alternator whine is caused by electrical interference from the alternator that enters the audio system through poor grounds, inadequate cable shielding, or improper cable routing. The whine changes with engine speed because the alternator's output varies with RPM.
Can alternator whine damage my speakers or stereo?
No, alternator whine won't damage your speakers or stereo. It's an annoying sound, not a destructive one. However, it can indicate underlying electrical issues that might cause problems if left unaddressed.
How do I know if it's alternator whine or another noise?
Alternator whine is a high-pitched sound that rises and falls with engine RPM. Static, popping, or crackling sounds typically come from different issues like damaged wires or poor connections. If the noise disappears when the engine is off, it's likely alternator-related.
Is a ground loop isolator always the best fix?
A ground loop isolator is a quick fix for many cases, but it's not always the best solution. Improving grounds and separating cables often solves the problem without any reduction in audio quality. The isolator is a good fallback when you can't easily fix the underlying issue.
When should I seek professional help?
If you've tried all the standard fixes and still hear whine, it's time to consult a professional. Car audio shops have specialized tools and experience diagnosing unusual cases. They can test your alternator, battery, and components to find the source of the noise.
Conclusion
Alternator whine is frustrating, but it's also one of the most solvable problems in car audio. In the vast majority of cases, the fix comes down to better grounding, proper cable routing, and clean connections—all things you can do yourself with basic hand tools and a little patience.
The key is to work through the fixes systematically. Start with the quick fixes: check your grounds, separate your power and audio cables, and tighten every connection. If the whine persists, move to the more involved solutions like replacing cables or adding a noise filter. Only in rare cases will you need professional help or component upgrades.
Next time you start your car and hear that familiar whine, you'll know exactly what to do. Pull out your multimeter, check your grounds, and work through the steps. Before long, you'll enjoy clean, clear music without any background noise—just the way it should be.
If you're also dealing with other car audio issues, like a stereo stuck in the wrong language, there are simple fixes for that too. Happy listening!

Leave a Reply