
You've just buckled your toddler in and something looks off. The shoulder straps are sitting at their neck, or maybe sagging below their shoulders. You tug at them, adjust the chest clip, but you're not sure.
Is this right? Where should shoulder straps be on car seat, anyway?
Here's the thing: getting this wrong isn't a minor detail. It's a safety-critical adjustment that can mean the difference between your child staying secure in a crash and slipping out of the harness entirely. The rules are simple to learn, but they change depending on whether your seat is rear-facing or forward-facing.
And unlike a lot of parenting advice, these aren't suggestions. They're engineered safety standards. In our research, we've found that misadjusted straps are one of the most common mistakes certified child passenger safety technicians see at inspection stations, right up there with loose harnesses and wrong chest clip placement.
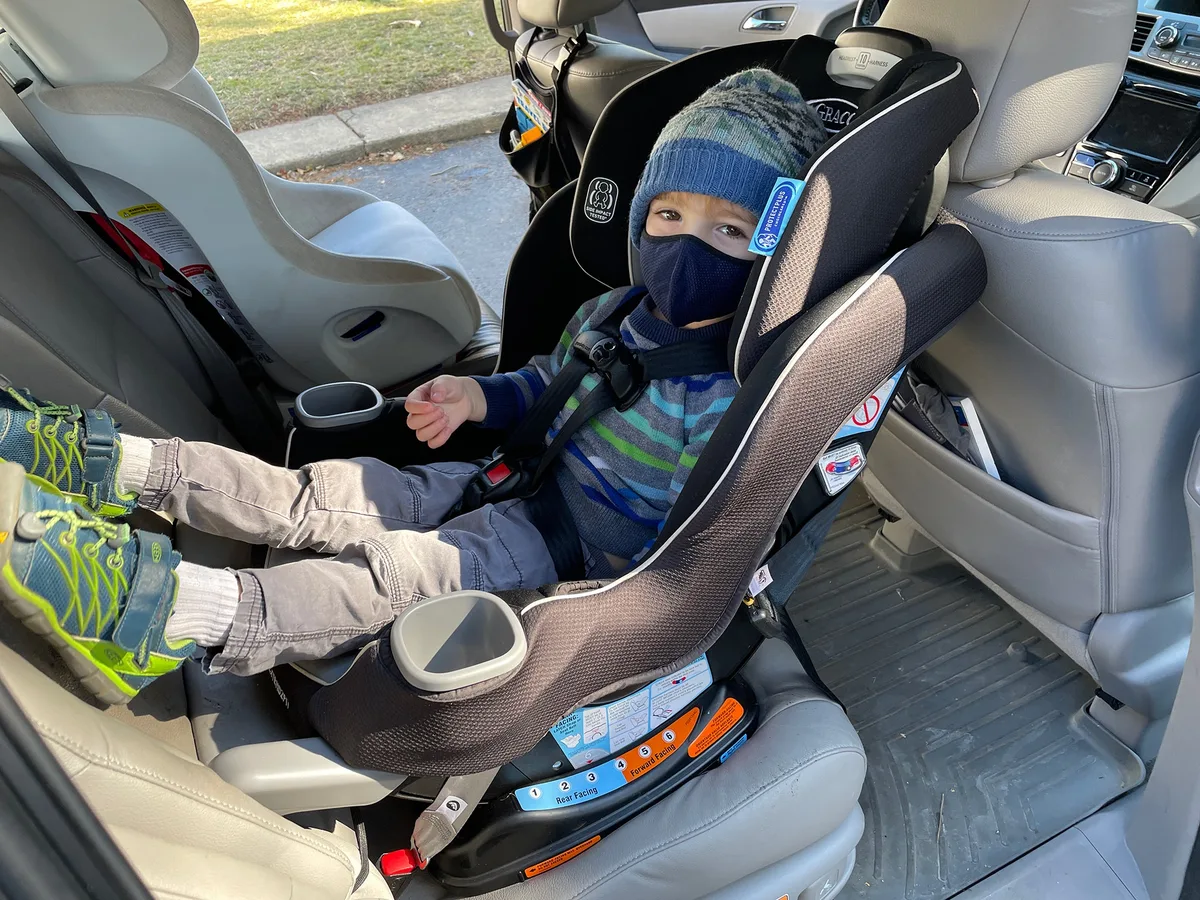
Image source: Web (Bing) / vroom.zone (Web image (fair-use with source credit))
Quick Answer
For rear-facing seats, shoulder straps must be at or below your child's shoulders. For forward-facing seats, straps must be at or above your child's shoulders. Straps should lie flat, with no twisting, and pass the pinch test.
If you can pinch harness webbing together at the collarbone, it's too loose. Chest clip should sit at armpit level.
Why Getting Shoulder Straps Wrong Is Dangerous
The harness in your car seat does one critical job. It distributes crash forces across the strongest parts of your child's body: the shoulders, the chest, and the pelvis. When the straps are positioned correctly, your child's body stays in the seat during a collision, and the impact energy spreads out instead of concentrating in one vulnerable spot.
Get the strap height wrong and you change that whole dynamic.
If the straps sit too high on a rear-facing child, the harness can ride up toward the neck and head. In a crash, that puts tremendous force on a small neck that's not designed to absorb it. Conversely, if the straps are too low on a forward-facing child, the forces of a crash push the child's body up against the straps.
The harness can compress the abdomen rather than holding the pelvis, which risks serious internal injury.
Think of it like a seat belt for an adult. When you wear a seat belt too high or too low across your torso, it's uncomfortable and less effective. For a child whose bones are still developing, the margin for error is much smaller.
The National Highway Traffic Safety Administration (NHTSA) and the American Academy of Pediatrics (AAP) both emphasize strap placement as a core component of car seat safety. Car seats are tested to Federal Motor Vehicle Safety Standard (FMVSS) 213, which assumes the harness is positioned correctly. When it's not, the seat can't perform the way it was designed to in testing.
The Core Rule: Rear-Facing vs. Forward-Facing Strap Heights
This is the heart of it, and it trips up more parents than you'd expect. The strap height rule flips depending on which direction the seat faces. Here it is, plain and simple.
- Rear-facing: Straps must be at or below your child's shoulders.
- Forward-facing: Straps must be at or above your child's shoulders.
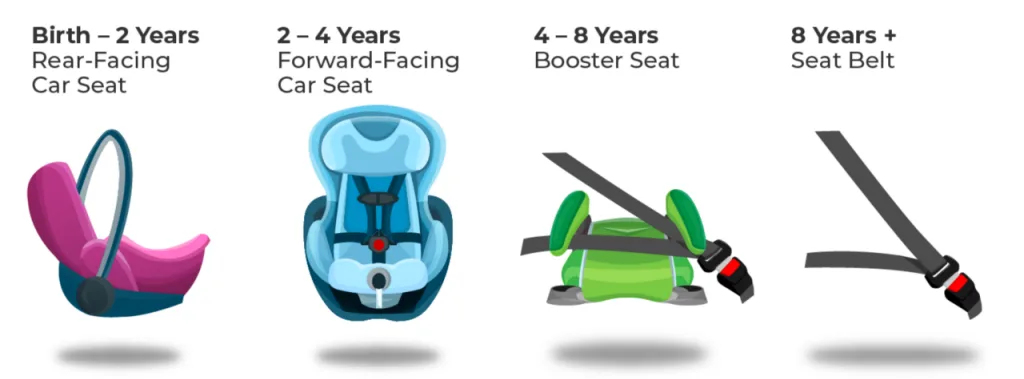
Image source: Web (Bing) / fity.club (Web image (fair-use with source credit))
Why the difference? In a rear-facing seat, the child's body is pushed deeper into the seat during a crash. The harness needs to hold them down and back.
Straps below the shoulders keep the child nestled into the seat, preventing upward movement that could expose the neck to the straps.
In a forward-facing seat, the child's body moves forward in a crash. The harness must catch them at the shoulders, which are strong enough to handle that load. Straps at or above the shoulder line keep the child from sliding up and out, and they keep the chest and head in the protected zone.
Here's the rule visualised.
| Seat Orientation | Strap Height | Why It Matters |
|---|---|---|
| Rear-facing | At or below shoulders | Keeps child snug in seat, protects neck and spine |
| Forward-facing | At or above shoulders | Holds child back in crash, prevents upward slippage |
| Seat Type | Strap Rule |
|---|---|
| Rear-facing | At or below shoulders |
| Forward-facing | At or above shoulders |
This rule applies to all 5-point harness seats, from infant carriers to convertible and all-in-one seats. The harness slot you use determines the effective strap height, so you need to check which slot you've threaded the straps through.
Step-by-Step: How to Adjust the Harness Slots Correctly
Adjusting the straps isn't hard, but it does require a bit of patience. Different car seat models handle this differently. Some have a continuous harness system that moves the harness up and down with the headrest.
Others require you to unthread the straps, move them to a new slot, and rethread everything.
Here's the general process that works for most seats.
- Check the manual first. Every seat has specific instructions. Don't skip this, no matter how confident you feel.
- Loosen the harness completely using the adjuster strap at the base of the seat.
- Unbuckle the chest clip and harness from the crotch buckle.
- Locate the harness slots in the seat back. On a convertible seat, you'll see multiple slots.
- For rear-facing: pick the slot closest to but not above your child's shoulders.
- For forward-facing: pick the slot closest to but not below your child's shoulders.
- Rethread the straps through the appropriate slots.
- Reconnect the straps to the crotch buckle and chest clip.
- Tighten the harness and do the pinch test.
- Double-check the height after tightening. It can change slightly as the harness cinches down.
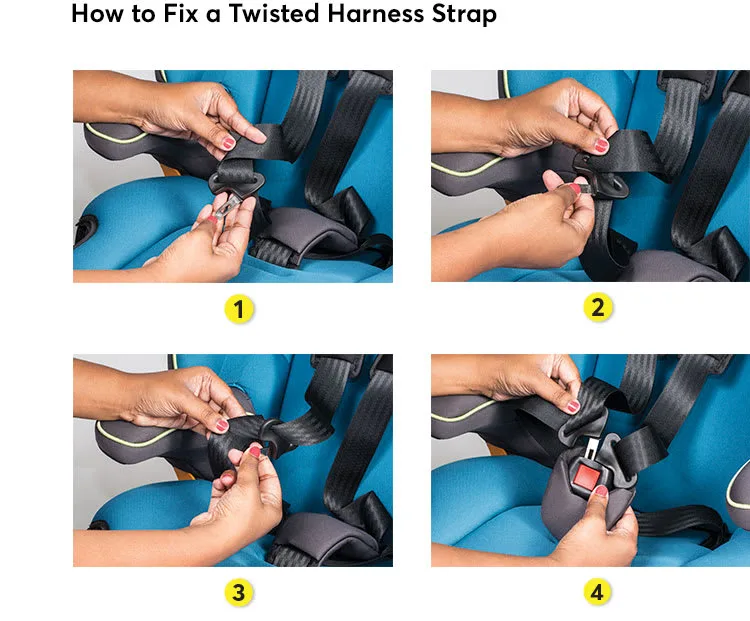
Image source: Bing (Web (fair-use with source credit))
On many newer seats, you don't have to rethread at all. The harness attaches to a metal bar behind the seat back that slides up and down as you adjust the headrest. If your seat has this system, simply loosen the harness, move the headrest to the correct height, and re-tighten.
It takes about thirty seconds.
For an infant carrier, the process is often simpler because the headrest and harness move as one unit. Check your specific model to see whether the harness slots are fixed or integrated into the headrest.
One thing to keep in mind: when you switch from rear-facing to forward-facing, the strap height rule flips. If you've been running the straps at the second slot from the bottom, you may need to move them up several slots when you turn the seat around. The shoulder harness positions are different, so don't assume the same slot works in both directions.
The Chest Clip: Where It Belongs (and Why It Matters)
The chest clip, sometimes called the retainer clip, is the plastic piece that slides up and down the harness straps. It sits at the child's chest, and it serves a specific purpose. It holds the straps in position over the shoulders.
If the chest clip sits too high, it can press against the throat, which is both uncomfortable and risky. If it sits too low, the straps can slip off the shoulders and the harness becomes ineffective.
The correct position is at armpit level. Picture an imaginary line running straight across your child's chest at the height of their armpits. That's where the chest clip belongs.
Why does this matter so much? In a crash, the chest clip keeps the harness straps on the shoulders. It doesn't absorb the main crash force, but it keeps the system in place so the harness can do its job.
Without it positioned correctly, the straps can slide apart and away from the body, causing what's known as "submarining," where the child slides under the harness.
A quick tip: after you buckle your child in, slide the chest clip up to armpit level before you tighten the harness. Tighten first, then adjust the clip. The clip will stay put once the harness is snug.
The chest clip should never sit on the abdomen or the neck. Both are signs of a misadjusted harness, and both reduce the effectiveness of the restraint system. If you hear your child complain about the clip digging in, check the position first before loosening the straps.
Chances are it might be too high, riding up into their neck.
The Pinch Test: How Tight Should the Straps Actually Be?
A correctly positioned strap is useless if the harness is too loose. This is where the pinch test comes in. It's a simple way to check whether the harness is snug enough.
Here's how you do it.
- After buckling and tightening the harness, take your thumb and forefinger.
- Try to pinch the harness webbing together horizontally at your child's collarbone.
- If you can pinch any excess fabric, the harness is too loose.
- If your fingers slip off because there's no slack, you're good.
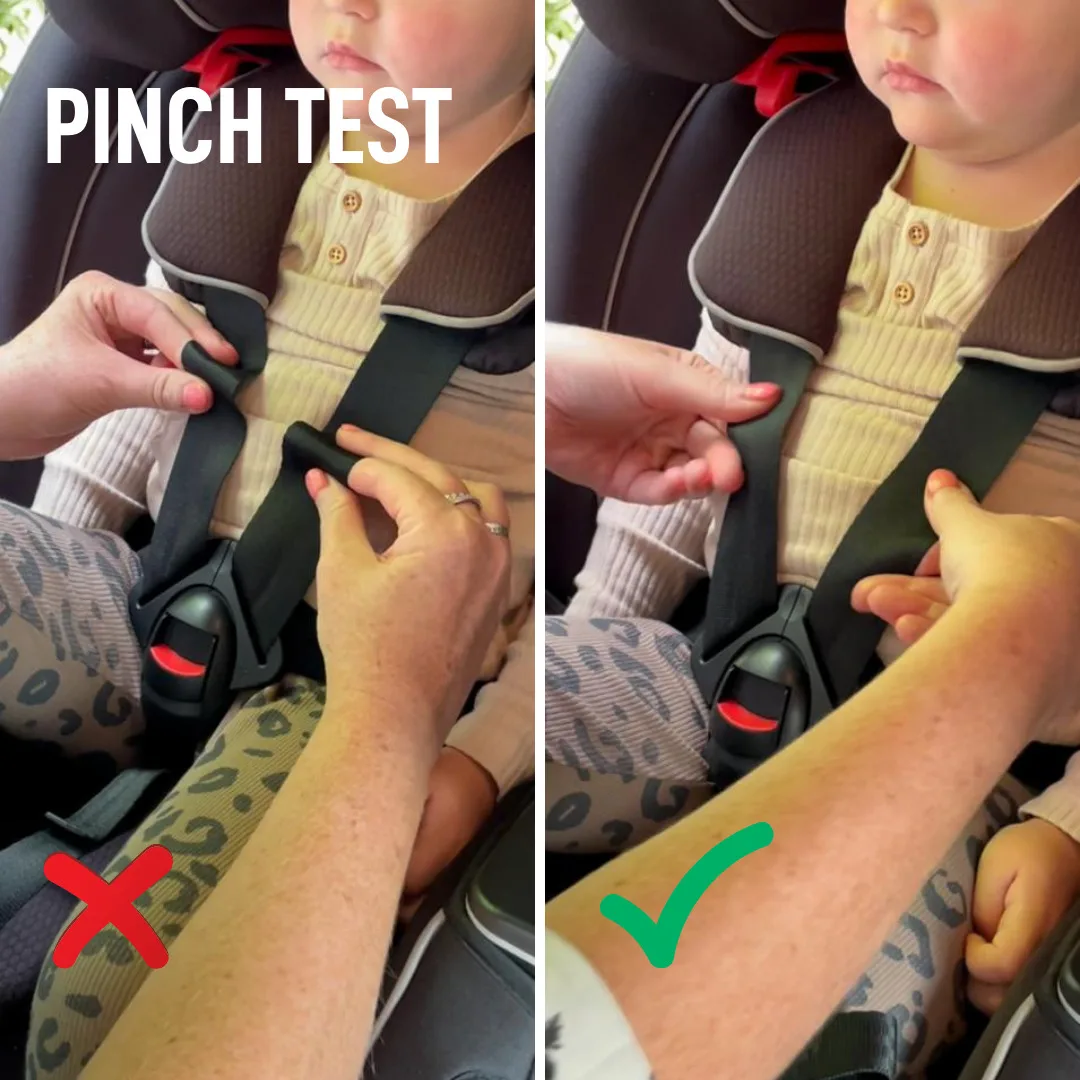
Image source: Bing (Web (fair-use with source credit))
The goal is a snug fit, not a tight squeeze. The harness should be firm against your child's body with no sagging. One way to think of it: if you can't fit more than one finger flat between the strap and your child's collarbone, you're in the right zone.
Many parents check the harness once when they buckle their child in and call it a day. But harnesses loosen over time. The child shifts, the straps settle, and the fit becomes less secure.
It's worth re-checking the tightness every time you get in the car, or at least every time you buckle your child in for a longer ride.
Winter clothing adds another layer of complexity. Bulky coats and snowsuits compress in a crash, adding space between the harness and your child's body. This extra space means the harness was actually too loose at the moment of impact.
The NHTSA recommends dressing your child in thin layers and placing a blanket over the harness straps for warmth. It's safer, and it means you don't have to choose between a cold child and a secure one.
For new parents, the pinch test can feel confusing at first. If you're unsure whether you're doing it right, schedule a check with a certified Child Passenger Safety Technician (CPST). They're trained to evaluate car seat installation and harness fit.
Many are available at no cost at local fire stations, hospitals, or police departments. If you're traveling and using a car seat in a rental car, a quick check before each ride is worth the extra minute, and you can plan a professional inspection if you're unfamiliar with the seat model.
7 Common Mistakes That Weaken Harness Safety
Even parents who nail the strap height can undermine it with small errors. Here are the most common ones we see in our research, and how to fix them.
1. Twisted straps. A twisted strap concentrates force in a narrow band instead of spreading it across the shoulder. Straighten the webbing before buckling.
If you see a twist, pull the strap through the slot until it's flat.
2. Harness too loose after a long drive. Kids shift, jackets compress, and straps settle. Re-tighten the harness at every stop.
The pinch test takes five seconds.
3. Moving to forward-facing too early. The American Academy of Pediatrics recommends keeping children rear-facing until at least age two, or until they exceed the seat's height or weight limit. Aggregate crash data shows rear-facing is significantly safer, so don't rush the transition based on the strap height rule alone.
4. Bulky winter coats. Coats and snowsuits create a false snug fit. The compression that happens in a crash leaves dangerous slack.
Dress your child in thin layers and tuck a blanket over the harness instead.
5. Aftermarket accessories. Strap covers, head supports, and extra padding not sold with the seat can interfere with harness positioning. Per FMVSS 213, seats are tested with their original components.
Anything added can change how the straps fit and perform in a crash.
6. Improper recline angle. A seat that's too upright or too reclined changes how the straps sit on the shoulders. Check the built-in level indicator and adjust the seat base accordingly.
7. Ignoring the manual when switching orientations. The strap height rule flips between rear-facing and forward-facing. Many parents keep the same slot they used before, which is wrong.
Re-read the manual when you turn the seat around, and move the straps before installing.
When to Seek a Professional Car Seat Check (CPST)
If you're second-guessing any part of your installation or harness fit, get help. A certified Child Passenger Safety Technician can inspect your seat, adjust the straps, and show you exactly how to get it right every time. The service is typically free and takes thirty to forty-five minutes.
You can find a CPST through the NHTSA's seat check locator, your local fire department, or many children's hospitals. It's worth scheduling a check after you install a new seat, after you switch orientations, or any time your child has a major growth spurt. Many parents do a check once and then ask the tech to walk them through their specific seat model.
That hands-on walkthrough is invaluable, and it doubles as instruction. If you're using a rental car seat while traveling, a quick check before each ride is a good habit. Planning ahead can help, and knowing whether you need a rental car seat with a rental car matters on your next trip.
Our research shows that the parents who get a professional check once rarely need a second one. Once you see the correct fit demonstrated in person, it's hard to get wrong again.
Your 60-Second Shoulder Strap Checklist
Before you start the engine, run through this quick list. It covers everything we've discussed, and it takes about a minute.
- Straps are flat, not twisted.
- Rear-facing: straps at or below shoulder level.
- Forward-facing: straps at or above shoulder level.
- Chest clip sits at armpit level.
- Harness passes the pinch test (no slack at the collarbone).
- No bulky coat or snowsuit under the harness.
- Child is within the seat's height and weight limits.
Do this every ride. It becomes muscle memory fast, and it eliminates the guesswork that leads to unsafe setups. If your child unbuckles themselves mid-drive, pull over safely and redo the whole checklist before continuing.
And if you're wondering about when your child can graduate to a booster seat, the checklist changes then too.
Frequently Asked Questions
What happens if the shoulder straps are too high in a rear-facing seat?
The harness can ride up toward the neck in a crash, concentrating force on the cervical spine. This creates a risk of neck and spinal injuries. Lower the straps to the next slot down so they sit at or below the shoulders.
What happens if the shoulder straps are too low in a forward-facing seat?
In a crash, the child's body moves forward and up against the harness. Straps positioned too low can compress the abdomen rather than the pelvis, causing serious internal injuries. Move the straps to the slot that puts them at or above the shoulders.
How often should I check the harness strap height?
Check every time you buckle your child in. Children grow quickly, and a fit that was perfect a week ago may be wrong today. The quickest way is to look at the strap at shoulder level each ride and adjust if needed.
You'll also want to do a full check after any growth spurt.
Can I use a towel or pool noodle to adjust the recline instead of moving the straps?
No. Adding anything under the seat that the manual doesn't specify changes the seat's crash performance. If you need a different recline angle, use the seat's built-in level adjusters or the pool noodle only if the manual specifically allows it.
Otherwise, rethread the harness to the correct slot and adjust naturally.
When should I schedule a professional car seat check?
Schedule one after installing a new seat, after switching from rear-facing to forward-facing, or any time you're unsure about the harness fit. It's also smart to book a check if your seat was involved in a moderate or severe crash, since the seat may need to be replaced. A quick check is free and gives you total peace of mind.
Final Recommendation
The only source of truth for your specific car seat is the manual that came with it. Manufacturers design each model differently, and some have unique harness systems or slot configurations. Read it, keep it in the seat's storage compartment, and never discard it.
The rules we've covered here apply across all seats tested to FMVSS 213. Rear-facing means straps at or below the shoulders. Forward-facing means straps at or above the shoulders.
The chest clip sits at armpit level. The harness passes the pinch test. Get those four things right, every ride, and you've removed the most common harness errors from the equation.
If you're ever unsure, default to caution. Keep the seat rear-facing as long as your child's size permits, which is the safest position regardless of strap height rules. And when in doubt, find a certified technician.
They're free, they're knowledgeable, and they genuinely want to help you protect your child.

Leave a Reply