
You've just spotted it. A coffee ring on the driver's seat, or a greasy smudge from last week's fast-food run, staring back at you every time you get in the car. Your first instinct is to grab whatever all-purpose cleaner lives under the sink and start scrubbing.
Stop right there.
That instinct is exactly how permanent leather damage happens. Automotive leather isn't like the hide on a sofa or a jacket. It's a composite material with a thin protective topcoat, and the wrong chemical can strip that coating, bond the stain deeper, or leave you with cracked, peeling seats that cost hundreds to repair.
Getting this right matters, and the process is simpler than you think.
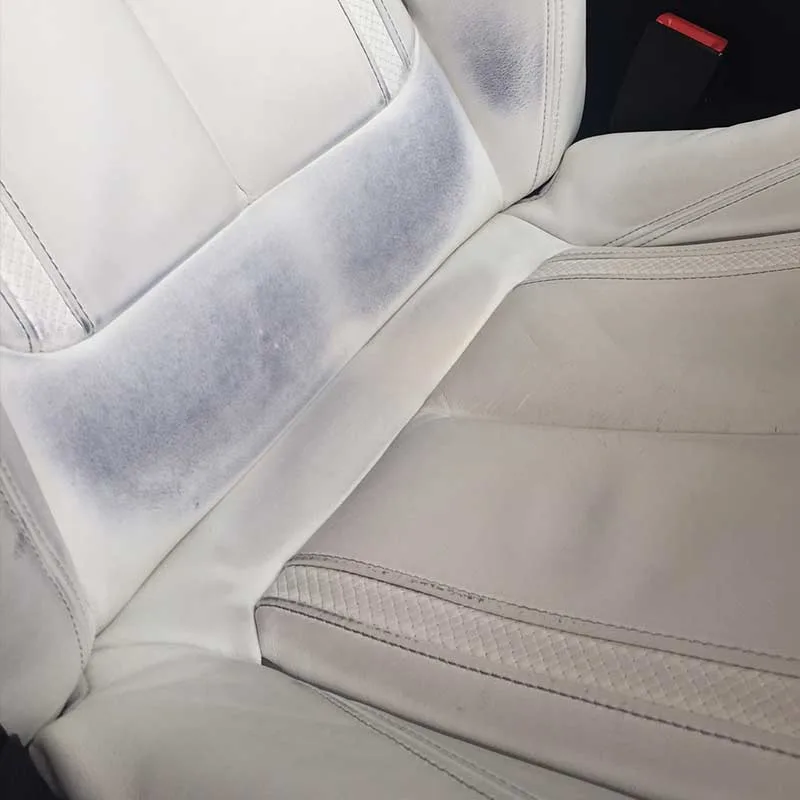
Image source: Web (Bing) / storage.googleapis.com (Web image (fair-use with source credit))
The Truth About Leather Car Seats: Why Generic Cleaners Fail
Let's clear something up first. The "leather" in most modern cars isn't what you picture when you think of a full-grain leather saddle. It's a split hide with a polyurethane or acrylic topcoat that carries the color and texture.
As of 2026, the vast majority of factory-installed leather seats are what industry standards call pigmented leather.
That topcoat is your seat's armor. It's also its weak point.
When you use a multipurpose household cleaner, you're often applying alkaline degreasers or solvents designed for countertops, not porous animal hide. These break down the topcoat's chemical bonds. The result?
The finish dulls, the protective layer weakens, and every future spill soaks deeper into the material beneath.
The High-Stakes Mistake Most Owners Make
The most common error isn't using the wrong product. It's using any product without understanding the stain first.
Here's the thing. Water-based stains like coffee or juice need a completely different approach than oil-based stains like sunscreen or cooking grease. And dye transfer from new denim is its own beast entirely.
Manufacturers like BMW and Audi explicitly warn against harsh cleaners and abrasives in their owner's manuals, yet most drivers never read that page.
The cost of getting it wrong is steep. A professional leather repair for a single damaged seat typically runs between $150 and $300, and re-upholstering a whole seat can push past $800. Compare that to the $20 to $50 you'll spend on a proper cleaning kit.
What This Guide Gets Right (and What Others Get Wrong)
Most advice floating around online is dangerously generic. "Use a leather cleaner and conditioner." That's it. No mention of pH balance, no stain identification, no warning about dwell time or scrubbing pressure.
This guide walks the full path. You'll learn to identify your stain type, test your leather's finish, and apply the exact process that detailers use. You'll also learn when to stop and call a professional.
That's the part most DIY articles skip, and it's often the difference between a $30 fix and an $800 mistake.
Quick Answer
To get stains out of leather car seats, identify the stain type first. Water-based stains lift with a gentle pH-neutral cleaner and soft brush. Oil-based stains need a solvent-based remover.
Dye transfer requires careful alcohol-free treatment. Always spot test in a hidden area. Never use household cleaners.
Condition after cleaning to restore oils.
Know Your Enemy: Identifying the Stain Type First
Before you touch a single towel, figure out what you're dealing with. This single step determines everything that follows. Get it wrong and you can bond the stain permanently into the leather fibers.
Image source: Web (Bing) / woodworkingadvisor.com (Web image (fair-use with source credit))
Take a close look at the stain's appearance and texture. Rub your fingertip across it gently. Does it feel raised or tacky?
That's a clue.
Water-Based Stains (Juice, Coffee, Mud, Soda)
Water-based stains sit mostly on the surface. They look like a ring or a dark patch but don't soak in deeply unless they've sat for hours. If it's fresh, blot it with a dry microfiber towel before doing anything else.
The longer it dwells, the deeper it penetrates the topcoat's microscopic pores.
Oil-Based Stains (Grease, Sunscreen, Body Oil, Food)
Oil-based stains are the sneaky ones. They darken the leather immediately and spread slowly outward. Sunscreen is the worst offender because it contains chemical UV filters that interact with the topcoat.
If the stain looks darker than the surrounding leather and feels slightly slick, you're dealing with oil. These need a solvent-based cleaner that breaks down the grease without attacking the leather itself.
Dye Transfer Stains (Denim, Ink, New Clothing)
Dye transfer looks like a blue or purple haze, usually on the bottom cushion or lower backrest where jeans rub against the seat. It's not a surface stain. The dye molecules bond with the topcoat on a molecular level.
Standard cleaners won't touch it. You need a formulated dye-transfer remover, and even then, some stubborn cases require professional re-coloring.
The "Unknown Stain" Protocol
Can't tell what it is? Go with the gentlest option first. Start with a pH-neutral cleaner and a soft brush.
If the stain doesn't budge after one gentle pass, step up to a solvent-based product. Skip that progression and you risk spreading the stain or pushing it deeper.
| Stain Type | Appearance | Feel | Primary Cleaner |
|---|---|---|---|
| Water-Based | Ring or dark patch | Smooth, flat | pH-neutral cleaner |
| Oil-Based | Darkened, spreading | Slick, greasy | Solvent-based remover |
| Dye Transfer | Blue/purple haze | Absorbed, not raised | Dye-transfer remover |
The Leather Finish: Why Your Seat's Topcoat Decides Everything
Not all leather is created equal. Before you buy a single product, you need to know what kind of surface you're working with. This isn't just technical jargon.
It's the difference between a successful cleanup and a permanent disaster.
Pigmented Leather (The Most Common)
Pigmented leather is what you'll find in 95 percent of cars with leather seats. The hide is coated with a colored polyurethane or acrylic layer, then sealed with a protective topcoat. It's durable, UV-resistant, and forgiving.
Most household spills don't penetrate the topcoat if you catch them quickly.
Your cleaning approach: pH-neutral cleaner, gentle agitation, no heavy solvents. The topcoat gives you a buffer, but that buffer is only as strong as the products you use. Harsh chemicals degrade it over time.
Semi-Aniline and Aniline Leather (The Fragile Ones)
Some luxury vehicles, think higher-end German and Italian models, use semi-aniline or aniline leather. These have little or no protective topcoat. The natural grain is visible, and the leather absorbs moisture like a sponge.
Spills that would sit on pigmented leather's surface soak right in.
Your cleaning approach: extreme caution. No solvent-based products. No excessive water.
A barely-damp microfiber cloth and a dedicated aniline-safe cleaner only. If you're not sure what your car has, check the owner's manual or contact the manufacturer.
How to Test Your Leather's Finish at Home
Here's a safe way to identify your leather type. Place a drop of water on an inconspicuous area, like under the seat or where the side bolster meets the bottom cushion.
- If the water beads up and stays on the surface: you have pigmented leather with an intact topcoat.
- If the water slowly absorbs and darkens the leather: you have semi-aniline or aniline leather.
That two-minute test tells you which cleaning products are safe and which will cause permanent damage. Remember, a leather seat with a compromised topcoat is the same as unprotected leather. Treat it accordingly.
And if you're dealing with the logistics of protecting those seats from daily wear, particularly if you have kids in car seats, you might want to check our guide on whether car seat covers damage leather seats. It's a question we hear constantly, and the answer depends heavily on the materials and the design.
Step-by-Step: How to Get Stains Out of Leather Car Seats
Now the actual process. This is the part that separates a clean seat from a ruined one. Take your time, gather your supplies, and follow each step in order.
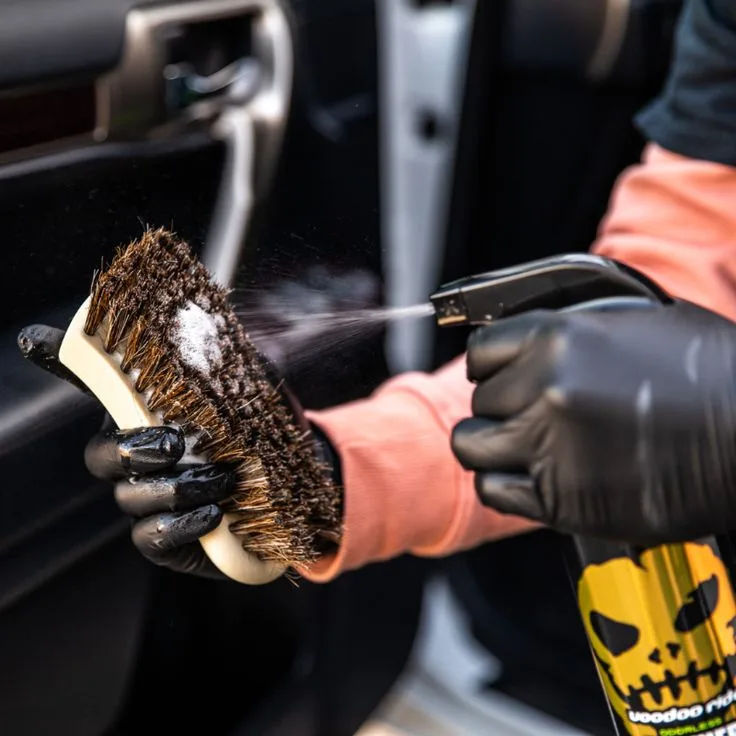
Image source: Web (Bing) / uk.pinterest.com (Web image (fair-use with source credit))
Here's what you'll need:
- A vacuum with a soft brush attachment
- A pH-neutral leather cleaner
- A soft-bristled horsehair detailing brush
- A pack of high-GSM microfiber towels (350 GSM or higher)
- A leather conditioner
- A spray bottle with clean water
Step 1: Vacuum and Prep the Surface
Start with a dry seat. Vacuum the entire surface to remove loose dirt, crumbs, and debris. This isn't just housekeeping.
If you skip this step, you'll grind abrasive particles into the leather while you clean. Pay special attention to the crevices and seams where grit accumulates.
If your vacuum struggle to reach into the tight spaces between the seat cushion and the center console, a good handheld unit makes the difference. We've covered how to choose a car vacuum cleaner if you're in the market for something that actually fits the job.
Step 2: The Hidden-Area Spot Test (Non-Negotiable)
This step isn't optional. Spray a small amount of your chosen cleaner onto a microfiber towel and dab it on an inconspicuous spot, like the underside of the seat or the side of the base cushion. Wait two minutes.
Check for discoloration, softening, or peeling.
If the leather reacts, the cleaner is too harsh for your seat. Switch to a milder product. If nothing happens, you're clear to proceed.
This test alone will save you from the most expensive mistake in this entire article.
Step 3: Cleaning Water-Based Stains
For coffee, juice, mud, or soda, follow this sequence.
Spray the cleaner directly onto your microfiber towel, not onto the leather. You want controlled moisture, not a soaked seat. Gently wipe the stained area in a circular motion, working from the outside of the stain toward the center.
This prevents the stain from spreading.
For stubborn spots, use the horsehair brush with light pressure. The goal is to agitate the cleaner without fraying the topcoat. Never press hard.
Let the brush do the work.
Step 4: Cleaning Oil-Based Stains
Oil needs a different approach. A pH-neutral cleaner won't cut through grease. Switch to a solvent-based leather cleaner designed for oil and grease removal.
Apply the solvent product to a towel and dab it onto the stain. Let it dwell for 30 to 60 seconds. The solvent needs time to break down the oil molecules.
Then blot, don't rub, with a clean section of towel. Repeat until the stain lifts. Patience matters here.
Rubbing aggressively will smear the oil deeper into the leather.
Step 5: Handling Dye Transfer and Ink Stains
Dye transfer is the hardest to remove. Standard cleaners won't touch it. You need a product specifically formulated for dye transfer, often sold as a "denim transfer remover" or "ink remover."
Apply it with a clean towel and work it in with gentle circular motions. Some products require multiple applications. Others need a dwell time.
Follow the manufacturer's instructions exactly. If the stain doesn't budge after two or three attempts, stop. Further effort risks damaging the topcoat.
This is the point where a professional might be the smarter call.
Step 6: Drying, Conditioning, and Buffing
Once the stain is gone, let the leather air dry completely. This usually takes 20 to 30 minutes at room temperature. Never use a hairdryer or heat gun.
Heat accelerates moisture evaporation and can crack the finish.
Once dry, apply a leather conditioner with a clean microfiber towel. Use a thin, even coat. Let it absorb for 10 minutes, then buff off any excess with a fresh towel.
Conditioning replaces the natural oils stripped during cleaning and keeps the hide flexible so it doesn't crack. If you need a deeper clean of the surrounding areas, we have a guide on how to vacuum under car seats effectively, because that's where all the hidden grit ends up.
Mistakes to Avoid: What Guarantees Permanent Damage
If there's one section worth reading twice, it's this one. Most leather seat damage isn't caused by spills. It's caused by the cleaning attempts that follow.
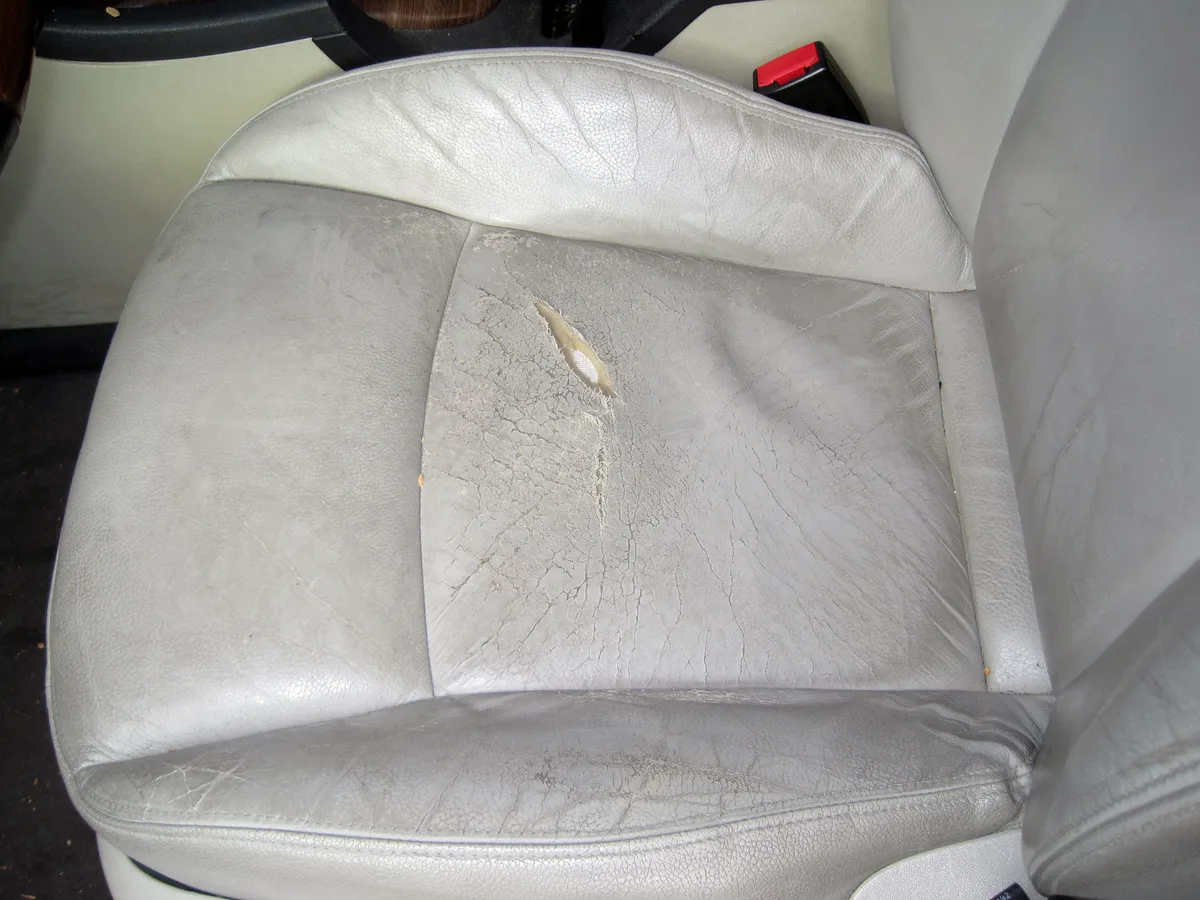
Image source: Web (Bing) / jooinn.com (Web image (fair-use with source credit))
Household Cleaners, Alcohol, and Ammonia (The Big Three Killers)
Your kitchen cabinet is not a leather care aisle. All-purpose cleaners, glass sprays, and disinfectant wipes all share one trait: they're formulated for non-porous surfaces. Automotive leather is porous, even with a topcoat.
Alcohol and ammonia are the worst offenders. Alcohol strips the protective topcoat and dries out the hide underneath. Ammonia breaks down the chemical bonds that hold the finish together.
Aggregate reviews from professional detailers consistently report the same outcome: dull, cracked, or discolored seats that were "cleaned" with these products.
Over-Wetting the Leather (Your Seat's Silent Death)
More moisture doesn't mean a deeper clean. It means a soaked seat.
When liquid penetrates past the topcoat into the foam padding beneath, it creates a breeding ground for mold and mildew. It also breaks down the adhesive that bonds the leather to the foam. You might not notice the damage for weeks, until the seat starts to sag or the leather wrinkles.
The rule is simple. Damp towel, not wet. Spray the cleaner on the towel, not the seat.
If the leather looks visibly wet, you've used too much.
Aggressive Scrubbing and the Right Way to Apply Pressure
Scrubbing harder feels productive. It's actually counterproductive. Leather's topcoat is thin, typically a fraction of a millimeter.
Aggressive pressure abrades it, creating micro-scratches that dull the finish and make it more absorbent.
Let the cleaner do the work. Gentle circular motions with a soft brush or microfiber towel are all you need. If the stain doesn't lift after a few passes, the cleaner isn't strong enough.
Switch products, not pressure.
Skipping the Spot Test
We said it in the step-by-step section, and we'll say it again. The spot test is non-negotiable. A cleaner that works beautifully on one car's leather can permanently discolor another's.
The two-minute test is the cheapest insurance you'll ever buy for your interior.
When to Call a Professional: Damage Beyond DIY
Not every stain is conquerable at home. Knowing when to stop is a skill in itself. Attempting advanced repairs without the right tools often makes things worse.
Cracks, Tears, and Blistered Finish
If the leather itself is physically damaged, cracked, torn, or bubbling, skip the DIY route. These conditions mean the topcoat has failed, and the hide beneath is exposed. Cleaning products won't fix that.
They might worsen it.
A professional detailer or upholstery shop has the tools to rebond the topcoat, fill cracks, and reapply color. Attempting this yourself with store-bought repair kits usually ends with visible patches and an uneven finish.
Deep Set-In Stains That Won't Budge
If you've tried the correct process twice, with the right products, and the stain hasn't lifted, stop. Further attempts risk degrading the leather itself. Some stains penetrate too deep for surface cleaning.
Professional repair costs typically run between $150 and $300 per seat. That might sound steep, but it's a fraction of the $800-plus replacement cost. It also beats the alternative of driving a car with a ruined interior that hurts its resale value.
What a Pro Repair Actually Costs (and What You're Saving)
Here's a realistic breakdown of what you're up against:
| Service | Typical Cost Range |
|---|---|
| Professional leather cleaning (full interior) | $100 – $250 |
| Stain-specific removal (single seat) | $50 – $150 |
| Topcoat repair and re-coloring (single seat) | $150 – $300 |
| Full seat re-upholstery | $400 – $800+ per seat |
Compare those numbers to the $20 to $50 you'll spend on a quality DIY cleaning kit. Regular maintenance is genuinely affordable. Paying for professional repairs is what happens when maintenance gets skipped.
Long-Term Maintenance: Keeping Stains Away in the First Place
Prevention beats reaction. Every time. A five-minute routine every few months saves you from the hour-long stain extraction sessions and the risk that comes with them.
The 3-Month Conditioning Cycle
Leather needs oil to stay flexible. Natural oils evaporate over time, especially in hot, sunny climates. Conditioning every three months replaces what's lost and keeps the hide supple.
Apply a thin coat of conditioner with a microfiber towel. Let it absorb for 10 minutes. Buff off the excess.
The leather should feel soft, not greasy. If it feels slick, you've used too much.
UV Protection and Sun Shade Habits
UV rays are leather's enemy. Prolonged exposure fades color, dries out the hide, and accelerates cracking. Parking in the shade or using a windshield sun shade goes a long way.
For added protection, some conditioners include UV inhibitors, so check the label.
Quick Emergency Wipes for the Car Door Pocket
Keep a small pack of pH-neutral leather wipes in the door pocket. When a spill happens, grab a wipe and blot, don't rub, the area immediately. Quick action stops most stains from setting.
It also prevents the need for deep cleaning sessions later.
If you're dealing with kids and car seats, the leather under those seats takes a beating. Our guide to whether car seat covers are safe for babies covers the protection angle if you're weighing your options.
Real Scenarios: What Actually Happens in a Daily Driver
Theory is useful. Examples are better. Here are three common scenarios and how the process plays out in real life.
The Toddler Juice Spill
A juice box gets squeezed into the seat cushion. The liquid spreads quickly, leaving a sticky, dark patch. Your move: blot immediately with a dry towel.
Then follow the water-based stain process with a pH-neutral cleaner. Caught within 10 minutes, the stain lifts in one pass. Left overnight, it might need two or three attempts and possibly a professional.
The Denim Transfer After a Long Drive
You drive eight hours in new jeans. When you get out, there's a faint blue haze on the driver's seat where your thigh pressed against the leather. This is dye transfer.
Standard cleaning won't touch it. You need a dedicated dye-transfer remover, applied with patience. If the haze is light, it lifts after one treatment.
If it's dark or sat for weeks, expect multiple applications or a professional re-coloring.
The Forgotten Fast-Food Lunch in Summer
A burger wrapper sits on the passenger seat for two hours in 90-degree heat. The grease melts into the leather. This is oil-based staining at its worst.
The solvent-based process is your best bet, but heat makes the oil spread deeper and faster. Quick action on a warm day is critical.
Frequently Asked Questions
Can I use vinegar and water on leather seats?
No. Vinegar is acidic and will strip the protective topcoat. Even diluted, it's risky.
The same goes for other homemade solutions like dish soap and water. Stick with products specifically formulated for automotive leather.
Is saddle soap safe for car seats?
Saddle soap is designed for tack and saddles, not automotive upholstery. It's too waxy and leaves a residue that attracts dirt. It also doesn't have the right pH balance for automotive leather's topcoat.
Use a dedicated pH-neutral leather cleaner instead.
Do leather conditioners actually prevent stains?
Conditioners help, but they're not a barrier. They keep the hide flexible and prevent cracking, which reduces absorbency. However, nothing truly repels stains like a hydrophobic coating.
If you want serious protection, look for a dedicated leather protector spray.
How long should I wait after cleaning before conditioning?
Wait until the leather is completely dry, usually 20 to 30 minutes at room temperature. Conditioning a damp surface traps moisture and prevents the conditioner from absorbing properly. Test with your fingertip.
The surface should feel dry to the touch.
The Final Verdict: A Simple Routine for Lasting Seats
Getting stains out of leather car seats doesn't require magic. It requires the right process and the right products. Identify the stain.
Use a pH-neutral cleaner. Work gently. Condition afterward.
Your Decision Guide Based on Stain Type and Severity
| Stain Type | DIY Success Rate | Time Needed | Pro Needed? |
|---|---|---|---|
| Water-based, fresh | High | 15 minutes | Rarely |
| Water-based, set in | Medium | 30 minutes | Sometimes |
| Oil-based, fresh | Medium | 30 minutes | Rarely |
| Oil-based, set in | Low | 45+ minutes | Often |
| Dye transfer | Low | Multiple sessions | Likely |
| Chemical damage | None | N/A | Always |
The Two-Minute Habit That Saves You Thousands
Here's the bottom line. A two-minute emergency wipe after every spill, a three-month conditioning schedule, and the right knowledge will keep your leather seats looking new for years. Skip those habits and you're gambling with a repair bill that could stretch into the hundreds.
Your seats are one of the first things people notice about your car. They're also one of the most expensive interior components to replace. Treat them right, and they'll reward you with years of clean, comfortable use.
What to Do If the Stain Is Already Set
If you're reading this after the stain has been sitting for days or weeks, don't panic. The process is the same, but expectations need adjustment. Set-in stains require more passes and more patience.
Start with the gentlest option and work up. If a pH-neutral cleaner won't budge it, step up to a stronger product. Multiple gentle attempts beat one aggressive scrubbing session every time.
The topcoat is thinner than you think, and preserving it matters more than perfect stain removal.
If you've tried twice and the stain hasn't lifted meaningfully, call a professional. Some stains penetrate past the topcoat into the hide itself. No surface cleaner will fix that.
A detailer has the tools and products to treat deeper damage without destroying the leather.
How to Avoid Spreading the Stain
Always work from the outside of the stain toward the center. This prevents the stain from expanding into clean leather. Use a fresh section of towel for each pass.
Reusing the same spot just re-deposits the stain you just lifted. If the stain spreads while you're cleaning, you're pushing it instead of lifting it. That means you need a different product, not more pressure.
Advanced: Leather Re-Coloring and Dye Kits
For severe stains or faded patches, re-coloring is the last DIY resort before professional repair. These kits contain a colored topcoat that you apply over the damaged area. They're not a quick fix.
They require careful color matching and a steady hand. The current topcoat wears off over time anyway, especially on high-use areas like the driver's seat. A re-coloring kit can blend those worn patches back in.
Use them only for localized damage, not entire seats. Color matching is the hardest part. Pigmented leather varies by manufacturer and year, even within the same model.
If the kit doesn't match perfectly, you'll see a visible patch. That's worse than the original stain.
Professional re-coloring services use custom-mixed pigments. They have access to the exact color codes for your car's interior. That's why they typically charge $150 to $300 per seat.
The kit costs $20 to $50, and the risk is yours.
Leather Care Products: What You Actually Need
You don't need a shelf full of products. You need four things, and they're affordable.
| Product | Purpose | Price Range |
|---|---|---|
| pH-neutral leather cleaner | Removes surface dirt and water-based stains | $10 – $20 |
| Solvent-based stain remover | Breaks down oil, grease, and sunscreen | $10 – $25 |
| Leather conditioner | Restores oils and keeps the hide flexible | $10 – $30 |
| Microfiber towels (350 GSM+) | Safe wiping and buffing without scratching | $5 – $15 |
That's the full kit. No brushes, no special applicators, no fancy gadgets. A soft horsehair brush helps with stubborn stains, but it's optional.
These four items cover 95 percent of what you'll ever need.
The Products to Skip
Furniture polish, armor-all style wipes, and "magic erasers" can ruin a leather seat. They leave residues, strip the finish, or abrade the topcoat. If it's not sold specifically for automotive leather care, don't put it on your seats.
Cost Breakdown: DIY vs. Professional
Here's the honest math on what you're likely to spend.
| Approach | Cost | Time | Risk |
|---|---|---|---|
| DIY cleaning (basic stains) | $20 – $50 | 1 – 2 hours | Low |
| DIY re-coloring (severe stains) | $20 – $50 | 2 – 4 hours | High |
| Professional cleaning | $100 – $250 | 1 – 2 hours | None |
| Professional repair | $150 – $300+ per seat | Same day | None |
The DIY route saves money and works for most stains. The professional route is worth every penny when the stain is beyond your skill level. Trying to save $30 on a $300 repair often ends with a $300 bill anyway.
That's the real calculation.
The Final Verdict: A Simple Routine for Lasting Seats
Getting stains out of leather car seats isn't complicated. Identify the stain. Use the right products.
Work gently. Condition afterward. That's the whole process.
Here's the decision guide one more time. Water-based stains lift with a pH-neutral cleaner. Oil-based stains need a solvent-based remover.
Dye transfer requires a dedicated product and patience. Chemical damage always means a professional.
The Two-Minute Habit That Saves You Thousands
The real secret isn't cleaning. It's prevention. Keep leather wipes in the door pocket.
Blot spills the moment they happen. Condition every three months. Park in the shade when you can.
Your seats are one of the most expensive interior components in your car. A consistent five-minute routine every few months keeps them looking new for years. That's the difference between a car with a $500 interior problem and one that holds its value.
The choice is yours.

Leave a Reply