
Adding an amplifier to your car stereo is one of the most satisfying upgrades you can make. It turns a thin, strained factory sound into something with real depth — punchy bass, clean vocals, and volume you can feel without distortion. The catch is that the wiring looks intimidating: thick power cables, RCA signal wires, and a dozen connections that all need to land in the right place.
The good news is that the process is very learnable. With a solid plan, the right parts, and a bit of patience, you can complete a clean, safe installation in an afternoon. This guide walks you through every step — from choosing an amp to tuning it for the best sound — and points out the common mistakes that trip up first-timers along the way. For more on this, see our guide on how to connect phone to car stereo.
Why Add an Amplifier to Your Car Stereo
Most factory head units build in a tiny amplifier that delivers only a fraction of the power your speakers can handle. Crank the volume and you quickly hit its ceiling: the sound distorts, bass turns muddy, and the speakers run out of headroom. An external amplifier changes that by giving you genuine, continuous power.
Here's what you gain:
- Cleaner sound at higher volume — the amp drives the speakers properly instead of the head unit struggling to keep up
- Real bass — subwoofers and larger woofers need serious wattage to move air, and only an outboard amp can supply it
- More headroom — music with dynamic peaks won't clip or strain
- Flexibility — you can run component speakers, multiple subs, or a full active system
If you listen to hip-hop, EDM, or anything with heavy low end, an amplifier isn't optional — it's the whole point. Even for podcasts and rock, the improved clarity makes every drive better. For more on this, see our guide on how to connect iphone to car stereo.
Before You Begin: What You'll Need
Gathering everything before you start prevents mid-install frustration. Here's your checklist:
- Amplifier — choose one whose RMS power rating matches your speakers (more on this below)
- Amplifier wiring kit — includes power cable, ground cable, RCA cables, remote turn-on wire, and a fuse holder
- Line output converter (LOC) — only if your factory stereo lacks RCA outputs
- Tools — wire stripper, crimp tool, socket set, screwdrivers, and electrical tape or heat shrink
- Ring terminals and ferrules — for clean, secure connections at the battery and amp
- Multimeter — invaluable for verifying power and ground before you button everything up
Wiring Kit Components at a Glance
| Component | Typical Gauge/Size | Purpose |
|---|---|---|
| Power cable | 8–4 AWG | Carries current from the battery to the amp |
| Ground cable | 8–4 AWG | Connects the amp to the car chassis |
| RCA cables | 2–4 channel | Carries the audio signal from stereo to amp |
| Remote turn-on wire | 18 AWG | Tells the amp when to power on |
| Fuse holder + fuse | Matches amp rating | Protects the system from short circuits |

A typical amplifier install in the trunk, with power and signal wires routed to the amp.
Credit: www.youtube.com
Step 1: Plan the Installation
Rushing into wiring is the fastest way to create noise, ground loops, or a blown fuse. Spend twenty minutes planning and the rest of the job goes smoothly.
Choose the amp's location. The trunk and the space under a seat are the two most common spots. Whatever you pick, leave room for airflow — amplifiers generate real heat, and a unit crammed into a sealed pocket will shut down under load.
Check your electrical system. A powerful amp draws significant current. If your battery is old or your alternator is weak, you may see headlights dimming when the bass hits. Before installing anything big, test your charging system and consider an upgrade if it's marginal.
Measure your wire runs. Power cable, RCA cables, and remote wire all need to reach from the amp to the front of the car. Measure the actual route — through the firewall, along the sills, into the trunk — and add a little slack. Too-short wire forces awkward splices; too-long wire becomes a tangled mess.
Read both manuals. The amplifier's manual specifies the exact fuse size, wire gauge, and terminal layout. The stereo's manual shows which RCA outputs and remote trigger to use. Skimming both now saves you from guessing later.
Step 2: Disconnect the Battery
This is non-negotiable. Before you touch any wiring, disconnect the negative terminal of the car battery and tuck the cable where it can't accidentally contact the post. This prevents short circuits, sparks, and damage to your stereo or the car's electronics.
Wait a few minutes after disconnecting before working — some systems hold a charge in capacitors that drain slowly.
Step 3: Run Power and Ground Wires
The power and ground cables are the amp's lifeline. Get these right and the rest is straightforward.
Routing the Power Wire
- Find the rubber grommet in your firewall where the factory wiring passes through. Push the power cable through it, or drill a new hole and install a grommet to protect the wire from sharp edges.
- Mount the fuse holder within 18 inches (45 cm) of the battery. This is critical — if the cable shorts anywhere along its length, the fuse near the battery is what stops a fire.
- Connect the power cable to the positive battery terminal, but leave the fuse out until you're ready to power up.
Grounding the Amplifier
- Pick a solid metal point on the chassis or frame as close to the amp as possible.
- Sand down to bare metal — paint and rust are insulators and will cause noise or intermittent cutouts.
- Use a short, thick ground cable and secure it with a bolt and star washer so it can't loosen over time.
A common mistake is grounding to a seat bolt or a painted bracket. That's how you get engine whine and an amp that mysteriously shuts off. Bare metal, short wire, tight connection — every time.
Step 4: Connect RCA and Remote Turn-On Wires
The RCA cables carry the audio signal from your stereo to the amplifier, and the remote wire tells the amp when to wake up.
RCA Cables
- Plug one end into the stereo's RCA outputs (front, rear, or both, depending on your system).
- Run the RCA cables down the opposite side of the car from the power wire. Keeping the signal cables away from the high-current power cable prevents alternator whine and other electrical noise.
- Connect the other end to the amp's RCA inputs.
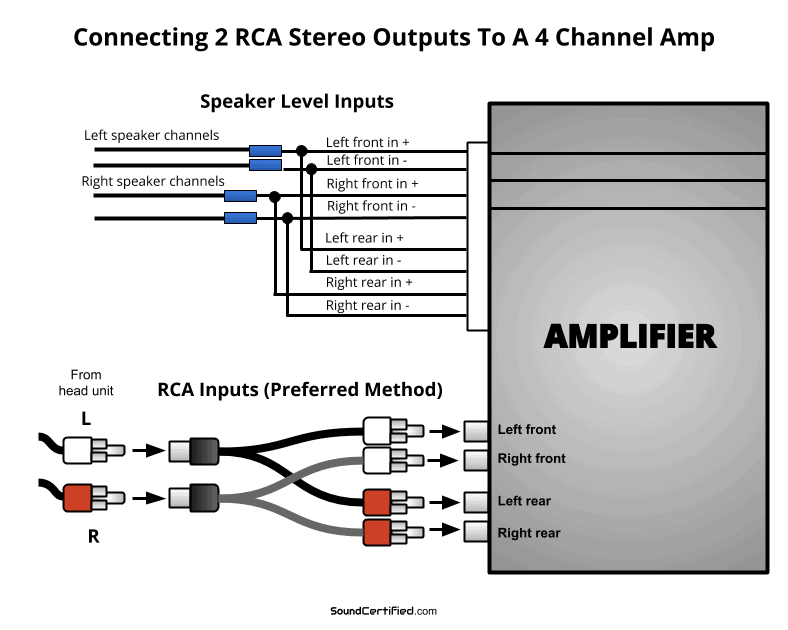
A Y-adapter lets a two-channel head unit feed a four-channel amplifier.
Credit: soundcertified.com
Remote Turn-On Wire
- Connect the thin blue wire to the stereo's remote output, usually labelled REM, AMP, or ANT.
- Run it alongside the RCA cables to the amplifier.
- Attach it to the amp's remote terminal.
If your head unit has no remote output, you can use a turn-on signal from a fuse that's live only when the ignition is on — but a dedicated remote wire is cleaner and more reliable.
Step 5: Wire the Speakers
Now connect the amplifier to your speakers or subwoofers.
For component speakers: Run speaker wire from the amp's output terminals to each speaker. Use 16-gauge wire or thicker for longer runs. Match polarity carefully — positive to positive, negative to negative. Reversed polarity causes phase cancellation and weak, hollow bass.
For subwoofers: Connect the sub to the dedicated subwoofer channel, or bridge two channels if your amp supports it. Check the manual for the correct bridged wiring — bridging the wrong channels is a fast way to send the amp into protection mode.
Make every connection secure, with no stray strands that could short against the chassis.
Step 6: Factory Stereo Without RCA Outputs
Not every car has aftermarket-friendly RCA outputs. If your factory stereo lacks them, you don't need to replace the head unit — you need a line output converter (LOC).
- Tap into the speaker wires behind the factory stereo.
- Connect the LOC's output to the amplifier's RCA inputs.
- Adjust the LOC's gain so the signal is strong but not distorted.
Many modern LOCs include remote turn-on sensing, which detects the speaker signal and switches the amp on automatically — no separate remote wire needed. Just double-check the LOC's gain setting when you tune the system, since a clipped signal from the converter will sound terrible no matter how good your amp is.
Step 7: Double-Check and Power Up
Before reconnecting the battery, go through every connection:
- Tighten all power, ground, and speaker terminals.
- Confirm no bare wire is exposed where it could touch metal.
- Install the fuse in the fuse holder.
- Make sure the amp is mounted securely and nothing can shift while driving.
Reconnect the battery, then turn on the stereo at low volume. Listen and watch for:
- The amp's power LED lighting up
- Sound from all connected channels
- No engine whine, humming, or buzzing
- No burning smells or hot components
If everything checks out, you're ready to tune.
Step 8: Tune Your Amplifier
Tuning is where good equipment becomes great sound. Most amps have three main controls: gain, crossover, and bass boost.
- Set the gain low — start around 25–40% and slowly increase until you hear distortion, then back off slightly. Gain matches the amp's input sensitivity to your head unit's output; it's not a volume knob.
- Adjust the crossovers — set a high-pass filter for speakers to block bass they can't reproduce well, and a low-pass filter for subwoofers to block mids and highs.
- Use bass boost sparingly — a little adds warmth, but pushing it high can blow speakers and strain the amp.
Amplifier Settings Reference
| Control | Recommended Start | Purpose |
|---|---|---|
| Gain | 25–40% | Matches input sensitivity |
| Bass boost | 0–3 dB | Adds low-frequency emphasis |
| High-pass filter | 80–120 Hz | Blocks bass from speakers |
| Low-pass filter | 80 Hz | Blocks highs from subwoofer |
Tune with music you know well. Familiar tracks make it easy to hear when something sounds wrong.

Reference diagram for adapting a home stereo signal to a car amplifier.
Credit: soundcertified.com
How to Choose the Right Amplifier
If you're buying an amp rather than using one you already own, focus on these factors:
- Power rating (RMS, not peak) — match the amp's RMS output to your speakers' RMS handling. Peak power is marketing; RMS is the continuous power that matters.
- Number of channels — a mono amp for a subwoofer, a 2-channel for front or rear speakers, a 4-channel for a full system.
- Physical size — measure your mounting location before buying. A massive amp won't fit under a seat.
- Reputation — stick with established brands and read independent owner reviews.
Amplifier Types Compared
| Type | Best For | Pros | Cons |
|---|---|---|---|
| Mono (1-channel) | Subwoofers | High power, simple | Can't drive speakers |
| 2-channel | Front or rear speakers | Flexible, bridgeable | Limited expansion |
| 4-channel | Full systems | Powers all speakers | Larger footprint |
The most common purchasing mistake is chasing peak power ratings. Ignore the "1,200 watts max" sticker and look for the RMS figure — that's what actually reaches your speakers.
Common Problems and How to Fix Them
Even careful installs hit snags. Here's how to handle the most frequent issues:
- No sound from the amp — check power, ground, and remote connections in that order. Inspect both fuses (the one near the battery and the one on the amp).
- Alternator whine or humming — re-route the RCA cables away from the power wire, and verify the ground is on bare metal.
- Amp enters protection mode — check for shorted speaker wires, confirm you bridged the correct channels, and inspect the ground.
- Distorted sound — lower the gain and confirm the speakers can handle the amp's power.
When you're stuck, there are solid references online — including the deep wiring references at The 12 Volt and a thorough walkthrough from Crutchfield.
Safety Tips for a Trouble-Free Install
- Always fuse the power cable within 18 inches of the battery.
- Never run wires where they can be pinched by seats, doors, or trim.
- Use the correct wire gauge for your amp's current draw — undersized wire overheats.
- Keep the battery disconnected until every connection is verified.
- Take your time. A rushed install is an unreliable install.
Plan for Future Upgrades
If you think you might add a second subwoofer or more speakers later, buy a wiring kit with headroom now. Running a thicker power cable and a 4-channel RCA set today costs little extra and saves you from redoing the whole install later.
Tidy Up After the Install
Once everything works, spend a few minutes cleaning up. Loose trim clips, wire offcuts, and debris often end up under the seats after an install — and it's the perfect time to clear them out. A quick pass with a cordless vac keeps the cabin clean while you're already down there. If you're shopping for one, picking the right vacuum makes a big difference, and a proper deep clean under the seats is easier than most people think.
Also, before you finish, spend a few minutes with your head unit's settings to set crossover points, time alignment, and any speaker levels — it makes the final amp tuning more accurate.
Frequently Asked Questions
How much does it cost to connect an amplifier to a car stereo?
Expect to spend $100 to $500 depending on the amp, wiring kit, and whether you install it yourself or pay a professional. DIY saves the labor fee, but make sure you have the right tools and comfort level before you start.
Can I install an amplifier without changing my factory stereo?
Yes. If your factory stereo has no RCA outputs, use a line output converter. It taps the speaker-level signal and feeds it to the amp, so you get better sound without replacing the head unit.
Will adding an amplifier drain my car battery?
A properly wired amp draws no power when the car is off. However, a very powerful amp can strain a weak battery or alternator. If you notice dimming lights or slow starts, upgrade your electrical system.
How do I choose the right fuse size?
Check your amplifier's manual for the recommended fuse. As a general rule, divide the amp's RMS wattage by the battery voltage (around 12V), then multiply by 1.25 for a safety margin.
Why does my amplifier overheat and shut off?
This usually means restricted airflow, overdriving the amp, or an impedance load that's too low. Move the amp to a cooler location, clear the vents, and lower the gain. Persistent overheating points to a wiring or speaker mismatch.
Conclusion
Connecting an amplifier to your car stereo is a project within reach of any careful DIYer. The key is methodical work: plan your routes, disconnect the battery, run clean power and ground, keep RCA cables away from power, and tune the gain with your ears rather than your eyes. Avoid the common mistakes — weak grounds, fused power too far from the battery, and mismatched RMS ratings — and you'll have a system that sounds fantastic and runs reliably for years.
Your next step is simple: measure your mounting space, order an amp and wiring kit that match your speakers' RMS ratings, and work through this guide one step at a time. If you want more help before you begin, browse our other guides — a little planning now saves hours of frustration later.

Leave a Reply