
So you've got a new stereo, the dash trim is off, and you're staring at a spaghetti of wires that all look identical. Every cable has a specific job, but telling them apart is the difference between a clean, professional-grade installation and a frustrating afternoon of blown fuses and dead speakers. This guide breaks down everything you need to know: the universal aftermarket color system, how factory wiring differs by brand, how to identify mystery wires with a multimeter, and the exact steps to connect everything safely. By the end, you'll have the confidence to install your stereo right the first time—without playing guessing games.
Why Wiring Color Codes Matter
Your car's stereo system uses a color-based language to tell you what every wire does. The yellow wire keeps your presets saved. The red wire decides when the stereo powers on. The black wire grounds the entire system. Each speaker pair carries audio to a specific corner of your car. You can also read our guide on how much does car stereo installation cost.
Getting these wrong isn't just frustrating—it can be expensive. Reversing positive and negative speaker wires makes your sound weak and muddy. Connecting a power wire to a speaker wire can fry your new stereo instantly. A short circuit can blow fuses or, in rare cases, damage your car's electrical system.
The good news: once you understand the standard colors, you can decode almost any aftermarket stereo harness. You'll also know exactly when to be suspicious and verify your work with a test light or multimeter. Before you start, taking a few minutes to understand the fundamentals will save you hours of troubleshooting later. You can also read our guide on how to fix car stereo touch screen.
Standard Aftermarket Stereo Wiring Color Codes
Nearly all aftermarket car stereos from major brands like Pioneer, Sony, Kenwood, JVC, and Alpine follow the same wiring color scheme. This consistency is a lifesaver when swapping out a factory radio. The standardization was driven by industry collaboration, and it's why the aftermarket stereo community can rely on consistent harnesses. The Consumer Technology Association has long supported uniform wiring standards to make installations safer and more predictable for DIYers.
Here is the full standard color code chart you'll use most often:
| Wire Color | Function | What It Does |
|---|---|---|
| Yellow | Constant 12V+ | Keeps memory settings alive; always has power |
| Red | Switched 12V+ | Turns the stereo on and off with the ignition |
| Black | Ground | Completes the electrical circuit (negative) |
| Blue | Power Antenna | Raises a motorized antenna when the stereo is on |
| Blue/White | Amplifier Remote | Turns on an external amp or powered subwoofer |
| Orange | Illumination | Controls backlighting dimming with dash lights |
| Orange/White | Dimmer | Connects to factory dimmer circuits for brightness sync |
| White | Left Front Speaker (+) | Positive signal to the front-left speaker |
| White/Black | Left Front Speaker (−) | Negative signal to the front-left speaker |
| Gray | Right Front Speaker (+) | Positive signal to the front-right speaker |
| Gray/Black | Right Front Speaker (−) | Negative signal to the front-right speaker |
| Green | Left Rear Speaker (+) | Positive signal to the rear-left speaker |
| Green/Black | Left Rear Speaker (−) | Negative signal to the rear-left speaker |
| Purple | Right Rear Speaker (+) | Positive signal to the rear-right speaker |
| Purple/Black | Right Rear Speaker (−) | Negative signal to the rear-right speaker |
This chart is your primary reference for most installations. Save it, screenshot it, or print it out before you start working. You can also read our guide on how to connect phone to car stereo.
Speaker Wire Color Codes Explained
Speaker wires work in pairs: a solid-color wire for positive and the same color with a black stripe for negative. Understanding this simple pattern helps you wire all four corners correctly.
Front Speakers
- White / White with Black Stripe — Left front speaker
- Gray / Gray with Black Stripe — Right front speaker
Rear Speakers
- Green / Green with Black Stripe — Left rear speaker
- Purple / Purple with Black Stripe — Right rear speaker
The solid color is always positive (+), and the striped wire is negative (−). When you look at the back of your stereo, you'll notice each pair is also marked with tiny labels, usually printed right on the plastic connector. You can also read our guide on how to change language on car stereo.
Reversing one speaker's polarity won't destroy anything, but it does matter. When a speaker is wired out of phase, it pushes air while the opposite speaker on the same channel pulls. Your bass gets thin, and sound seems to come from everywhere except the correct position. A quick test: play a track with a strong mono bass line. Walk around the car and listen to the front doors. If the bass sounds hollow or weak, flip the positive and negative wires on one speaker and test again. Getting this right is the difference between crisp, punchy audio and a hollow mess.
Power And Ground Wire Colors: Getting the Essentials Right
Three wires control whether your stereo powers up and remembers your settings. They deserve your full attention.
The yellow wire provides constant battery power. It keeps your clock, radio presets, and EQ settings stored even when the ignition is off. In most installs, you connect this to a 12V source that bypasses the ignition switch.
The red wire is the switched power source. It only receives voltage when the key is in the ACC or ON position. This wire tells your stereo when to wake up and when to sleep, preventing you from draining the battery while the car is parked.
The black wire is the ground. It must make solid metal contact with the car chassis. A weak ground connection causes all sorts of mysterious problems: low volume, alternator whine, or a stereo that shuts off when you hit bumps. In practice, a common mistake is grounding to paint-covered metal. Scrape the surface to bare steel or find an existing factory grounding point.
A common mistake is swapping the yellow and red wires. If you do this, your stereo may still work—but it won't remember settings because the memory circuit loses power every time you turn off the car. Worse, if you connect both to constant power, your stereo stays on until the battery dies.
Factory Wiring Color Codes by Car Brand
Here's the catch: automakers do not follow the aftermarket universal color standard. Toyota, Honda, Ford, Chevrolet, and Nissan each use their own unique color schemes. If you're installing an aftermarket stereo, the factory harness colors almost never match your stereo's wires.
| Brand | Constant 12V | Switched 12V | Ground | Typical Speaker Wire Pairings |
|---|---|---|---|---|
| Toyota | Blue/Yellow | Gray | White/Black | Purple/Pink, Light Green/Dark Green |
| Honda | Yellow | Red/Black | Black | Brown, Red, Blue, White (varies by model) |
| Ford | Red/Green | Light Green/Violet | Black/Green | White, Green, Purple, Blue (paired with stripe variants) |
| Chevrolet | Orange | Pink | Black | Light Green, Dark Green, Light Blue, Dark Blue |
| Nissan | Red/Yellow | Red | Black | Gray, White, Brown, Blue |
This table is a starting point, not a guarantee. Even within the same brand, wiring can change between model years and trim levels. Your safest move is to verify any factory wire before connecting. Most quality harness adapters eliminate this problem entirely. And if your car is relatively new, you may be dealing with a data-bus system rather than traditional analog wires—we'll cover that in detail below.
Special Function Wires: Antenna, Amp, and Illumination
Beyond power and speakers, you'll find a handful of wires designed for optional features. Understanding what they do lets you decide which ones to connect and which to safely ignore.
The blue wire triggers a power antenna. If your car has a motorized mast that extends when the radio plays, this wire controls it. Modern cars rarely use power antennas, so you can usually leave it disconnected and capped.
The blue/white wire is the amplifier remote turn-on. This wire sends a 12V signal to your external amp or powered subwoofer, telling it to power up whenever the stereo is on. If you're running an amplifier, connect this to the REM or AMP TURN-ON terminal on your amp. If you have no external amp, leave it disconnected.
The orange wire controls illumination. It dims your stereo's display when you turn on the headlights. Some stereos also use a separate orange/white wire for factory dimmer integration. These wires are optional in most aftermarket installations—a stereo works fine without them. If the wiring doesn't match your car, just cap the wire off.
Wiring Harness Adapters: The Smart Installer's Secret
The single best investment you can make before starting your installation is a vehicle-specific wiring harness adapter. These adapters plug directly into your car's factory connector on one side and feature standard aftermarket wire colors on the other.
Why Use an Adapter?
- No cutting factory wires — If you ever reinstall your factory stereo, it plugs right back in
- Color matching made easy — The adapter uses standard aftermarket colors, so you match same-to-same
- Preserves your car's electrical integrity — Cutting into factory wiring can void warranties or reduce resale value
- Reduces installation time — Most of the work is plugging and twisting, not tracing wires
To find the right adapter, search for your exact vehicle year, make, and model. Most auto parts stores carry them, and they cost far less than the price of replacing a damaged wiring harness.
When You Really Need an Aftermarket Interface
Some modern vehicles use a Class-D digital data-bus system rather than analog speaker wires. If you disconnect the factory radio and see no traditional speaker wires, you'll need an interface module that translates the digital signals for your aftermarket stereo. These modules also integrate steering wheel controls, backup cameras, and vehicle settings menus.
Recognizing this before you start saves you hours of frustration. If your factory stereo screen controls climate, vehicle settings, or safety features, a simple harness adapter is not enough. You'll need a compatibility check and potentially a defined interface module.
How to Install Your Car Stereo: Step by Step
Now that you understand the colors, here's the complete installation sequence in practical order.
Step 1: Disconnect the Battery
Always disconnect the negative battery terminal before touching any wiring. This prevents short circuits and protects the stereo's delicate internal components. Keep the cable away from the terminal while you work.
Step 2: Remove the Factory Stereo
You'll either need a set of dash removal tools or a pair of radio removal keys, depending on your vehicle. The factory radio usually slides out after releasing clips or removing screws, but certain cars are trickier—especially European and newer models with tight trim panels. Work through the trim carefully to avoid cracked plastic and bruised knuckles.
Step 3: Identify Your Wiring
If you're using a harness adapter, this step is easy. The adapter plugs into the factory connector and presents you with standard-colored wires. If you're connecting directly to factory wires, match each wire by function using a multimeter—never rely purely on color when working with factory wiring you're unsure of.
Step 4: Make Solid Connections
You have three main options:
- Crimp connectors (butt splices) — Fast, reliable for most installs
- Soldering — The most permanent and robust connection if done well
- Screw-on wire connectors — A viable option for harness adapters
Whatever method you choose, the connection must be mechanically snug before you insulate it. Do not simply twist wires together and wrap them in tape. Vibration is constant in a car, and loose twists eventually separate or corrode.
Step 5: Insulate Every Connection
Quality electrical tape or heat-shrink tubing protects each connection from moisture and shorts. If a bare positive wire touches a metal bracket or another wire, you'll blow a fuse or trigger a short circuit.
Step 6: Test Before Reassembling
Connect the battery, turn the ignition to ACC, and test every function before you bolt the stereo back in. Confirm you get sound from all four corners, the fader and balance controls work correctly, and the display dims with your headlights if you connected the illumination wire. This is also the time to adjust any settings—if you need help navigating the menus afterward, we have tips for adjusting the on-screen language settings.
Step 7: Secure the Wiring
Use zip ties or tape to bundle the wiring so it can't interfere with the stereo's chassis or the dashboard's moving parts. Loose wires can rattle, and worse, they can become pinched and short out later.
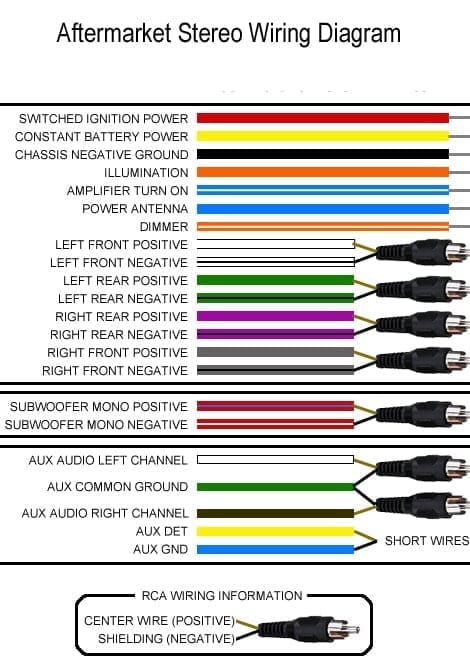
This aftermarket harness shows the standard color scheme used by most stereo brands, making wire matching straightforward.
Credit: www.caraudionow.com
Common Wiring Mistakes and How to Avoid Them
Even experienced installers make mistakes. Here's what to watch for:
Mixing up speaker wire polarity. The result is weak bass and odd sound staging. Always match the striped wire to the negative terminal for every speaker.
Forgetting to connect the ground wire properly. A ground connected only to paint-covered sheet metal is not grounded. Scrape the metal to bare steel or find a factory grounding point.
Leaving unused wires bare. Any unconnected wire should be capped with a wire nut or wrapped in electrical tape. A loose blue wire carrying 12V can short against the chassis.
Using cheap harnesses with mismatched wires. Bargain harnesses sometimes use thinner gauge wire than your stereo can handle. When in doubt, consider using a quality brand adapter or upgrading to a direct-soldered installation.
Trusting the car's original colors without verification. Factory wiring color codes are rarely consistent across brands, trims, or model years. The wrong assumption is what leads to expensive fried stereos—a scenario a simple multimeter test can prevent.
Using a Multimeter to Verify Wiring
A digital multimeter is the most valuable tool for identifying unknown wires. If you're dealing with a car that's been modified or has factory wiring you don't recognize, test before connecting.
Checking for Constant 12V
Set your multimeter to DC volts. Touch the black probe to a known good ground (the metal chassis works). Touch the red probe to your candidate yellow wire. If you read battery voltage (about 12.6V) with the key off and on, you've found constant power.
Checking for Switched 12V
Use the same setup, but this time note the reading with the key off versus the key in the ACC position. A true switched wire reads 0V with the key off and battery voltage with the key on. If you find a wire with constant voltage, that's the yellow memory wire.
Testing Speaker Wires
With the stereo unplugged, set the multimeter to ohms. Find a speaker wire you suspect and probe its two wires. A typical car speaker reads between 4 and 8 ohms of resistance. This confirms both wires belong to the same speaker and helps you verify polarity.
Testing for a Safe Ground
The ground wire should read near 0 ohms between the black wire and the metal chassis. If you get a high reading, you've found a poor or floating ground.
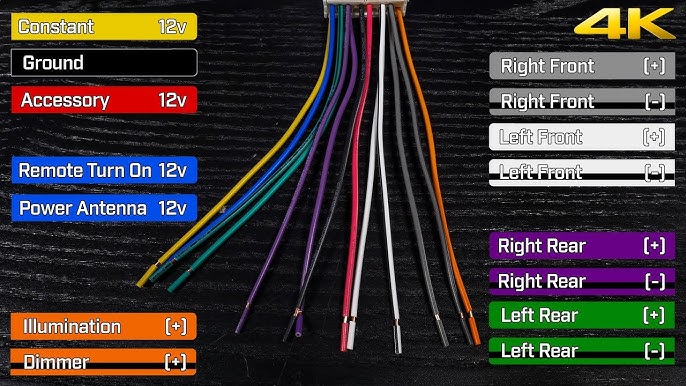
Measuring voltage with a multimeter confirms whether a wire carries constant or switched power before you make a connection.
Credit: www.youtube.com
What To Do When Color Codes Don't Match
So you've found a wire with a color you've never seen. Don't panic—here's how to handle it.
Check the wiring harness adapter documentation. Quality adapters include a printout or sticker showing exactly what each wire connects to.
Search for your vehicle's specific wiring diagram. Forums and dedicated car audio resources often have detailed factory diagrams for individual model years. This is especially important for older European cars, which had wildly different wiring schemes.
Use a multimeter to identify the function directly. The measurements don't care about colors. Tracing each wire this way takes patience but always gives you the right answer.
Ask a professional. If you've exhausted your options and still can't identify a critical wire, a professional installer will have access to full manufacturer wiring databases. The cost of an hour of their time is far less than a fried stereo.
Car Stereo Wiring Colors in the Modern Vehicle
Car audio wiring has changed more in the past five years than in the previous two decades. Many modern vehicles no longer provide simple analog speaker wires at the radio connector. Instead, the audio signals travel over a digital data bus using technologies like MOST or other proprietary protocols.
This creates a real obstacle for DIY installation. If your vehicle uses a digital system, a simple adapter won't suffice. You'll need a CAN-bus interface module that translates the factory digital signals into standard analog outputs your new stereo can understand. These modules add cost but preserve features:
- Steering wheel audio controls
- Factory backup camera integration
- Vehicle settings accessible through the stereo screen
- Amplifier and premium sound system integration
Before buying an aftermarket stereo for a new car, confirm whether your audio system uses analog or digital signals. This one step saves a major headache mid-installation.
Frequently Asked Questions
What Happens If I Connect the Wrong Wires?
You'll notice problems immediately in most cases: no sound, a dead stereo, blown fuses, or smoke in the worst-case scenario. Speaker polarity mistakes sound odd but rarely cause damage. Power and ground mistakes are the dangerous ones—always double-check these before powering up.
Are Car Stereo Wire Colors Always the Same?
No, and this deserves emphasis. Aftermarket stereos follow a consistent standard, but factory wiring varies enormously by brand, model, and year. Always verify factory wiring with a harness adapter or multimeter before connecting.
Can I Install a Car Stereo Without a Wiring Harness Adapter?
Yes, but it's riskier. You'll need to cut the factory connector and splice wires directly. This makes future stereo replacements harder and may reduce your car's resale value. The small cost of an adapter is worth the convenience and safety.
How Do I Test Speaker Wires If the Colors Are Faded?
Use a multimeter to check resistance between wire pairs—a speaker typically reads 4 to 8 ohms. To confirm polarity, you can also use a 1.5V AA battery. Touch it briefly to the two wires; if the speaker cone pushes outward, you have the polarity right.
Do I Need To Connect All the Wires?
No. The essential wires are yellow (constant power), red (switched power), black (ground), and the speaker wires for each speaker you're using. Wires for antenna, amplifier remote, and illumination are optional. Cap any unused wires individually to prevent short circuits.
What Should I Do if My Car Uses a Digital Audio Bus?
You'll need a vehicle-specific interface module that converts the digital signals to analog. These are available from major car audio manufacturers and typically require programming for your exact vehicle. A professional installation shop can handle this cleanly if you're not confident.
Making Your Installation Last
A stereo installation only feels satisfying if it still works flawlessly months later. That means using quality parts and sound technique from the start.
Use soldered and heat-shrunk connections for critical power, ground, and speaker wires whenever possible. Use a fused power connection near the battery if you're running a dedicated power wire to an amplifier. Route speaker wires away from power cables to avoid alternator whine. And seat your stereo properly in its mounting sleeve so nothing rattles.
One aspect people forget: adapt the retention clips, brackets, and trim rings properly. A loose stereo not only rattles but stresses the wiring connections behind it.
Conclusion
Car stereo wiring color codes are your roadmap to a successful installation. Aftermarket stereos use a consistent scheme—yellow for constant power, red for switched power, black for ground, and colored pairs for speakers. Factory wiring is another story entirely, which is why a harness adapter is almost always worth the investment.
The practical formula is simple: disconnect the battery, confirm your wiring with a multimeter or harness adapter, make solid and insulated connections, and test everything before reassembling your dashboard. When in doubt, or when facing a modern digital audio bus, call in a professional before you risk damaging a new stereo.
You now have everything you need to wire your car stereo with confidence. With the wiring done right, the only thing left to do is enjoy the drive. And if you run into any other questions down the road, check out our general blog for more practical automotive guidance.

Leave a Reply