
Cleaning car battery terminals might sound simple, but it’s one of those tasks many drivers ignore until their car refuses to start. If your battery terminals have corrosion, you could face weak starts, electrical issues, or even damage to your battery. Regular cleaning not only keeps your car running smoothly but also extends battery life. Many beginners worry about safety or feel unsure about the steps, but with clear guidance and a bit of patience, you can handle this job with confidence.
This guide will walk you through everything you need to know about how to clean car battery terminals and remove corrosion. You’ll learn why terminals get dirty, what materials to use, how to clean safely, and tips to prevent future buildup. You’ll also find practical advice, expert comparisons, and answers to common questions—all in plain, clear English.
Understanding Car Battery Terminal Corrosion
Corrosion is a chemical reaction that happens when battery acid, metal, and air mix. The result is a white, blue, or green powdery substance on the terminals. This corrosion can block electrical flow, making your car hard to start or causing strange electrical problems.
Even small amounts of corrosion can cause poor contact, leading to performance issues.
Why Does Corrosion Happen?
Car batteries release hydrogen gas during normal operation. When this gas reacts with the metal terminals and moisture in the air, it creates corrosion. The most common causes include:
- Age of battery: Older batteries produce more gas. As batteries age, their internal plates break down, increasing the chance of acid leaks and gas release. If your battery is more than three years old, check it more often.
- Overcharging: Too much voltage increases gas release. Overcharging happens if the alternator malfunctions or you use a charger without automatic shutoff. Excess gas speeds up corrosion, especially in warm weather.
- Leaks: Cracks or damage let acid escape. Acid leaks are dangerous and can damage other engine parts. If you see liquid around the battery, clean it but also check if the battery needs replacing.
- Weather: Humid or rainy environments speed up corrosion. Rain, fog, and coastal air all increase moisture, making corrosion faster. People living near the ocean or in rainy areas should inspect terminals more often.
- Poor connections: Loose or dirty terminals are more prone to buildup. Loose connections cause sparking, which can create heat and speed up corrosion. Always check that cables are tightly attached.
One non-obvious insight: Many people believe only old batteries corrode, but even new batteries can have terminal buildup if the cables are loose or the vehicle is regularly parked outdoors.
Types Of Corrosion
Different colors mean different chemical reactions. Here’s a quick comparison:
| Color | Likely Cause | Effect on Battery |
|---|---|---|
| White | Lead sulfate buildup | Blocks electrical flow |
| Blue/Green | Copper sulfate from terminals | More common on positive terminal |
| Brown/Rust | Iron corrosion | Usually from clamps or bolts |
Recognizing the type of corrosion helps you understand if there’s a deeper issue, like a battery leak or damaged wiring. For example, blue-green corrosion often appears if your terminals are made of copper or have copper components. Brown or rusty corrosion usually means metal parts (like clamps or bolts) are exposed to water or battery acid.
If you regularly see unusual colors or heavy corrosion, it may signal problems beyond normal buildup, such as acid leaks or damaged battery casing.
Tools And Materials Needed
Before cleaning, gather everything you need. Using the right tools makes the job safer and faster. Having everything on hand avoids unnecessary delays and reduces risk.
Essential Tools
- Safety gloves: Protect your hands from acid and corrosion. Nitrile or rubber gloves are best.
- Safety goggles: Shield your eyes from splashes. Acid can cause serious eye injuries.
- Wrench or pliers: For loosening terminal bolts. Make sure the tool fits snugly to avoid slipping.
- Wire brush: Cleans off tough buildup. Battery brushes have stiff bristles and are shaped for terminals.
- Baking soda: Neutralizes acid. Common kitchen baking soda is enough.
- Water: For mixing and rinsing. Use clean tap water.
- Small container: To mix cleaning solution. A plastic cup or bowl works well.
- Clean cloths: For drying and wiping. Cotton rags or paper towels are fine.
- Old toothbrush: Useful for tight spaces. It can reach small areas near the terminal clamp.
- Petroleum jelly: Prevents future corrosion. A small amount covers each terminal.
Having a dedicated cleaning brush for your battery helps avoid spreading grease or dirt from other tools.
Optional Tools
- Battery terminal puller: Removes stubborn terminals. Useful if cables are stuck or corroded tightly.
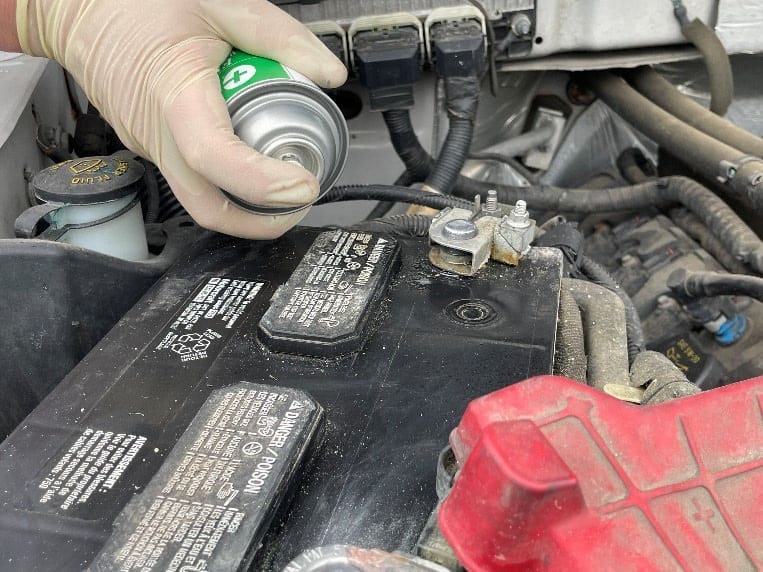
- Terminal cleaning spray: Commercial cleaners can save time. Some sprays also coat terminals to prevent future buildup.
- Multimeter: Checks battery voltage before and after cleaning. This tool helps confirm if your battery is healthy.
Safety Tips
- Always wear gloves and goggles. Even small acid splashes can hurt skin or eyes.
- Work in a well-ventilated area. Battery gases can be harmful.
- Avoid open flames or sparks near the battery. Hydrogen gas is flammable.
- If you see cracks or leaks, replace the battery—don’t just clean it. Damaged batteries can explode or leak acid.
One extra tip: Remove metal jewelry before cleaning. Rings, bracelets, and watches can conduct electricity and cause burns or shocks if they touch battery terminals.
Step-by-step Guide: Cleaning Car Battery Terminals
Cleaning battery terminals isn’t difficult, but careful steps help prevent mistakes and injuries. Here’s a practical process with extra tips for best results.
1. Turn Off The Vehicle
Before touching the battery, make sure the car is off. Remove the keys and let the engine cool. This prevents accidental electric shocks or short circuits. Never work on a battery while the engine is running.
2. Locate The Battery And Inspect
Open the hood and find the battery. Check for signs of:
- Corrosion: Powdery white, blue, or green buildup. Look closely at both terminals and cable clamps.
- Leaks: Wet spots or acid stains. Acid can eat away plastic and metal.
- Damage: Cracks, bulges, or loose terminals. A bulging battery may be overheated or overcharged.
If you see serious damage, don’t continue. Replace the battery instead. Cleaning a damaged battery is unsafe and won’t solve deeper problems.
A second insight: Some cars have plastic covers over the battery. Remove these covers for full inspection, but put them back after cleaning to help protect the terminals.
3. Disconnect The Battery
Always disconnect the negative terminal (black, marked with “-”) first. This reduces the risk of short circuits.
- Use a wrench or pliers to loosen the nut. Hold the tool steady to avoid slipping.
- Gently lift the cable off. Wiggle it slightly if it’s stuck.
- Repeat for the positive terminal (red, marked with “+”).
Some people make the mistake of removing the positive terminal first. This can cause sparks or damage if your tool touches metal. Always remove negative first, reconnect positive first.
If cables are stuck, use a battery terminal puller rather than forcing them. Forcing can damage the terminal or cable.
4. Prepare Cleaning Solution
Mix a tablespoon of baking soda in a cup of water. Stir until dissolved. Baking soda neutralizes battery acid and loosens corrosion. You can also add a few drops of dish soap to help remove greasy buildup.
If you use a commercial cleaner, follow instructions carefully. Some sprays require waiting for a few minutes to dissolve corrosion.
5. Apply The Solution
Dip a brush or cloth into the solution. Gently scrub the corroded areas. For tough buildup, pour the solution directly onto the terminals and let it bubble for a few minutes. The fizzing action means the acid is being neutralized.
If corrosion is very thick, repeat application as needed. Don’t rush—let the solution do the work.
6. Scrub The Terminals
Use a wire brush or old toothbrush to clean off corrosion. Scrub in circles for best results. Avoid using metal tools that could scratch or damage the terminals. Clean both the terminal and the inside of the cable clamp.
If corrosion is stubborn, use a terminal cleaning spray after initial scrubbing. Some sprays work better for thick blue-green buildup.
7. Rinse And Dry
After scrubbing, rinse the terminals with clean water. Make sure no baking soda or corrosion remains. Dry thoroughly with a clean cloth. Moisture left behind can cause new corrosion.
Check under and around the battery for drips. Wipe up any liquid to avoid damage to other parts.
8. Clean Cable Ends
Don’t forget to clean the cable ends (the metal part that touches the terminal). Use the same solution and brush. Dry well before reconnecting. Dirty cable ends can cause poor contact even if the terminals are clean.
If cable clamps are rusty or damaged, replace them for better performance.
9. Reconnect The Battery
Attach the positive terminal first, then the negative. Tighten the nuts, but don’t over-tighten—this can break the terminal. Make sure clamps are snug but not crushing the post.
If you hear a crack or see movement after tightening, check for damage.
10. Apply Petroleum Jelly
Spread a thin layer of petroleum jelly on each terminal. This acts as a barrier, reducing future corrosion. You can also use terminal protector spray for longer-lasting protection.
Don’t use too much jelly—just a light coating is enough.
11. Test The Battery
Start the car. If it starts easily and electrical systems work well, the job is done. If not, check for loose cables or deeper battery problems. Test lights, radio, and other electronics to confirm.
If you notice issues, double-check all connections and inspect for hidden corrosion.
Comparing Diy Vs Professional Cleaning
Some drivers prefer to do the job themselves, while others choose a mechanic. Let’s compare the two approaches:
| DIY Cleaning | Professional Service |
|---|---|
| Low cost Takes 20–30 minutes Learn basic car care Risk of mistakes or injury |
Costs $20–$100 Takes 10–20 minutes Expert advice No risk to you |
If you’re comfortable with basic tools, DIY cleaning is simple. But if your battery is damaged, leaking, or you’re unsure, professional help is safer. Mechanics can spot hidden issues, such as alternator problems or cable damage, that many beginners miss.
A hidden benefit of professional service: Some shops test your battery and charging system as part of the cleaning job, helping you avoid future breakdowns.
Signs You Need To Clean Battery Terminals
Don’t wait until your car won’t start. Watch for these signs:
- Slow engine start: Takes longer to turn over. Especially noticeable in cold weather.
- Dim lights: Headlights or dashboard lights are weak. Flickering lights can mean poor electrical contact.
- Electrical problems: Radio, windows, or other electronics act up. Sometimes, electronics reset or lose memory.
- Visible corrosion: Powder or crust on terminals. Any visible buildup should be removed.
- Frequent jump starts: Battery needs boost often. If jump starts work but the battery soon fails again, check the terminals.
If you see these symptoms, check your battery terminals first. Many electrical problems can be solved by cleaning and tightening connections.
How Often Should You Clean Battery Terminals?
Most experts recommend checking terminals every 6 months. If you live in a humid climate, drive often, or have an older battery, check every 3 months.
Cleaning regularly helps prevent major issues and keeps your battery healthy. Many beginners believe batteries are “maintenance-free,” but even sealed batteries can have terminal buildup.
One overlooked tip: Clean terminals before winter and summer. Extreme temperatures stress batteries, and clean terminals help ensure reliable starts.

Credit: www.youtube.com
Preventing Future Corrosion
Cleaning is only part of the solution. Preventing corrosion saves time and avoids breakdowns.
Best Practices For Prevention
- Apply petroleum jelly or terminal protector spray after cleaning. This seals the metal against moisture and acid.
- Make sure terminals are tight—loose connections increase risk. Check for movement after tightening.
- Avoid overcharging your battery. Use a charger with an automatic shutoff. Overcharging can destroy batteries and cause leaks.
- Replace old or damaged cables. New cables ensure strong, reliable contact.
- Install felt washers under cable clamps. These absorb acid and moisture. They’re cheap and easy to install.
- Park your car in a dry, sheltered spot if possible. Avoid parking under trees that drip sap or in areas that flood.
If your car sits unused for long periods, disconnect the battery or use a trickle charger to keep it healthy.
New Battery Technology
Modern batteries often have sealed designs, reducing gas release. However, even these can have corrosion if cables aren’t clean or tight. When buying a new battery, ask for one with anti-corrosion features.
Some batteries use special alloys or coatings to resist corrosion. Ask your battery dealer for recommendations based on your climate and driving habits.
Common Mistakes To Avoid
Even experienced drivers make errors when cleaning battery terminals. Here are some frequent mistakes:
- Skipping safety gear: Acid can burn skin and eyes. Always protect yourself.
- Using metal tools aggressively: Can crack terminals or cause sparks. Use gentle pressure and the right size tool.
- Pouring water directly on battery: Risk of short circuits. Always rinse away from the battery casing.
- Forgetting to clean cable ends: Buildup there also blocks electrical flow. Dirty clamps can cause repeat problems.
- Over-tightening bolts: Can damage terminals and cables. Snug is enough.
- Not drying thoroughly: Moisture invites new corrosion. Air dry or use a cloth.
- Ignoring leaks or cracks: Cleaning won’t fix a damaged battery. Replace if you see damage.
Another mistake: Using household cleaners or acid removers not meant for batteries. Stick to baking soda or products labeled for battery use.
Battery Terminal Cleaner Products: Are They Worth It?
Many stores sell sprays or pastes for cleaning battery terminals. Are they better than baking soda and water? Let’s compare.
| Homemade Solution | Commercial Cleaner |
|---|---|
| Cheap (under $1) Easy to make Works for most buildup |
Cost $5–$15 Designed for tough corrosion Often includes protection ingredients |
For light corrosion, homemade solutions work well. For heavy or stubborn buildup, commercial products may be worth it. Some sprays include anti-corrosion chemicals for extra protection, which can be helpful if you live in a humid area.
If you drive multiple vehicles or work on batteries often, keeping a commercial cleaner handy can save time and effort.
Real-world Example: Cleaning A Corroded Terminal
Let’s look at a real example. Maria, a driver in Florida, noticed her car took longer to start. She opened the hood and saw blue-green buildup on her battery terminals. She followed the steps in this guide:
- Put on gloves and goggles.
- Turned off the car.
- Removed the negative and positive cables.
- Mixed baking soda and water.
- Scrubbed terminals and cable ends with a wire brush.
- Rinsed and dried thoroughly.
- Applied petroleum jelly.
- Reconnected cables.
Her car started easily, and lights were bright again. Maria learned the importance of regular checks and now cleans her terminals every six months.
A second insight from Maria’s story: She also noticed her radio memory was resetting before cleaning. After cleaning, her electronics worked properly. This shows how small maintenance tasks can solve annoying electrical issues.
Credit: www.cortecvci.com
Battery Terminal Cleaning: Cost And Time Estimates
Cleaning battery terminals is a low-cost job, whether you do it yourself or hire a professional.
- DIY: Under $5 for materials. Takes 20–30 minutes.
- Professional service: $20–$100 depending on shop. Takes 10–20 minutes.
A common beginner mistake is thinking cleaning must take a long time. With practice, you’ll finish quickly.
If you have several cars or work with batteries often, investing in a battery cleaning kit can make the process faster and safer.
Safety And Environmental Concerns
Battery acid is dangerous. Always:
- Wear gloves and goggles.
- Keep children and pets away.
- Dispose of old batteries and cleaning waste properly.
Most cities have recycling centers for batteries. Never throw old batteries in regular trash—they contain toxic materials.
If you’re unsure about safe disposal, check local regulations or visit EPA Battery Recycling.
When cleaning, use a tray or mat to catch drips and avoid polluting soil or concrete. Wipe up spills right away.

Credit: www.youtube.com
Troubleshooting After Cleaning
Sometimes, problems remain after cleaning. Here’s what to check:
- Car still won’t start: Battery may be dead. Test with a multimeter. A healthy battery should show 12.4–12.7 volts when off.
- Corrosion returns quickly: Check for leaks or loose cables. Fast corrosion often means acid escaping or poor connections.
- Electrical issues continue: Inspect alternator and wiring. Sometimes, alternator failure causes overcharging and repeated corrosion.
If you’re stuck, ask a mechanic for help. Don’t ignore repeat problems—a simple cleaning can’t fix deeper electrical faults.
Battery Maintenance Checklist
Regular checks keep your battery healthy. Here’s a simple checklist:
- Inspect terminals every 3–6 months.
- Clean any visible corrosion.
- Tighten cable clamps.
- Check for leaks or cracks.
- Test battery voltage.
- Apply petroleum jelly after cleaning.
- Replace battery every 3–5 years.
Following this routine prevents most battery problems. Add battery checks to your oil change or tire rotation schedule for convenience.
Frequently Asked Questions
What Causes Battery Terminal Corrosion?
Corrosion is caused by hydrogen gas released from the battery reacting with moisture and metal. Overcharging, old batteries, and leaks make it worse.
Can I Use Vinegar Instead Of Baking Soda?
Yes, vinegar can clean light corrosion. However, baking soda is better for neutralizing acid and is safer for battery materials. Vinegar is acidic, so rinse thoroughly after cleaning.
Is It Safe To Touch Battery Terminals?
If the battery is disconnected and you wear gloves, it’s safe. But always avoid touching terminals with bare hands, especially if there is visible corrosion.
How Do I Know If My Battery Needs Replacing Instead Of Cleaning?
If your battery has cracks, leaks, bulges, or fails to hold a charge after cleaning, it’s time to replace it.
What’s The Best Way To Prevent Future Corrosion?
Apply petroleum jelly or terminal protector spray, keep terminals tight, and check every few months. Felt washers under clamps also help.
Cleaning car battery terminals might seem like a minor job, but it can make a huge difference in how your car runs. With the steps and tips in this guide, you’ll handle corrosion safely and efficiently. Regular maintenance saves money and prevents breakdowns.
If you ever feel unsure, don’t hesitate to ask a professional—your car’s battery is a vital part of its performance. Now you have the knowledge to keep your terminals clean and your car reliable for years to come.

Leave a Reply