
Upgrading your car stereo is one of the most satisfying DIY projects you can tackle. A modern head unit brings crystal-clear audio, hands-free calling, and smartphone integration to even the oldest daily driver. But for a first-timer, the wiring behind the dash can look like a confusing tangle of colored cables.
The truth is, with a methodical approach and the right preparation, you can install a new stereo in a single afternoon. This guide walks you through every stage—from gathering the correct tools to testing your finished installation—so you can enjoy your upgraded sound system without the expensive shop labor. You can also read our guide on car stereo wiring color codes.
Before You Begin: Planning Your Installation
A successful stereo swap starts long before you touch a screwdriver. Taking a few minutes to plan will save you frustration later.
Determine Your Stereo Size and Dash Type
Car stereos come in two standard sizes:
- Single DIN: Approximately 7 inches wide by 2 inches tall. Common in older vehicles and many trucks.
- Double DIN: Approximately 7 inches wide by 4 inches tall. This larger size accommodates touchscreen displays and is standard in most modern vehicles.
Measure your current radio's opening or check your owner's manual before purchasing. Many vehicles require a dash kit—a plastic trim piece that bridges the gap between your new stereo and the factory dash opening. These kits are specific to your car's make, model, and year, so verify compatibility before ordering. For more on this, see our guide on how much does car stereo installation cost.
Choose the Right Features for Your Needs
Modern head units offer a wide range of capabilities. Prioritize the features that matter most:
- Bluetooth for hands-free calling and wireless music streaming
- Apple CarPlay / Android Auto for navigation, messaging, and app integration
- USB and AUX inputs for connecting devices directly
- Touchscreen display for intuitive controls
- Backup camera support for added safety and convenience
While premium features are tempting, a reliable unit with the essentials often delivers the best value.
Tools and Materials Needed
Having everything within reach before you start makes the job much smoother. Here's your complete checklist:
| Tool | Purpose |
|---|---|
| Phillips and flathead screwdrivers | Removing screws and trim clips |
| Plastic panel removal tools | Pry off dash trim without scratching or breaking clips |
| Wire strippers and crimpers | Prepare and join wires securely |
| Butt connectors | Join wires reliably without soldering |
| Soldering iron and heat shrink tubing | Create the strongest, most durable wire connections |
| Multimeter | Verify power, ground, and speaker wires |
| Socket set | Remove bolts securing the factory radio |
| Electrical tape | Insulate connections and prevent shorts |
You'll also need three essential parts, specific to your vehicle:
- Wiring harness adapter: Connects your car's factory wiring to the new stereo's harness without cutting any original wires.
- Dash kit: Fills the gap around the new unit for a factory-like appearance.
- Antenna adapter: Matches your car's antenna plug to the input on the new stereo.
Many online retailers offer vehicle-specific packages that bundle all three items together.
Safety First: Disconnecting the Battery
Before touching any wiring, you must disconnect the battery. This step is non-negotiable—it prevents accidental short circuits that can blow fuses or damage your new stereo.
- Turn off your car and remove the key from the ignition.
- Open the hood and locate the battery.
- Using a wrench, loosen the nut on the negative (–) terminal—the one marked with a minus sign and typically fitted with a black cable.
- Lift the cable off the terminal and move it aside so it cannot touch the battery post.
If your vehicle has a security system or memory settings (like radio presets or seat positions), consult your manual first. You may need a code to re-enable the radio after reconnecting the battery. For more on this, see our guide on how to change language on car stereo.
Removing the Old Stereo
With the battery disconnected, you can safely begin the removal process.
Remove the Dash Trim
The stereo is almost always hidden behind plastic trim panels. Choose a starting corner and gently insert a plastic panel removal tool. Apply steady, even pressure to pop the clips free, working your way around the panel. Avoid using metal tools, which can gouge the plastic.
Unscrew and Slide Out the Unit
Once the trim is removed, you'll see screws or bolts holding the stereo in place. Remove them and set them aside—you'll reuse them for the new unit. Carefully slide the stereo out of the dash, supporting it with one hand. The wires at the back are connected, so pull gently.
Unplug All Connectors
At the back of the old unit, you'll find:
- A large wiring harness plug
- The antenna cable
- Additional connectors for steering wheel controls, auxiliary inputs, or other features
Unplug each connector with a gentle wiggling motion. Never yank the wires. Once free, remove the old stereo completely.
Pro tip: Take a photo of the wiring layout before unplugging anything. This reference is invaluable if you need to double-check a connection later.
Wiring the New Stereo
This is where most people get nervous, but it's entirely manageable with the right approach. The key is using a wiring harness adapter.
Understanding the Wiring Harness Adapter
A harness adapter connects your car's factory wiring directly to your new stereo's wiring. It plugs into the car's existing plug on one end and provides bare wires on the other, which you connect to the stereo's harness. This eliminates the need to cut or splice into your vehicle's original wiring, making the installation reversible and safer.
The aftermarket stereo's wires follow a standard color code. Your car's adapter wires will match these colors, making the connection straightforward.
Standard Stereo Wire Color Code
| Wire Color | Function |
|---|---|
| Yellow | 12V Constant Power (memory) |
| Red | 12V Switched Power (ignition) |
| Black | Ground |
| Blue/White | Remote/Amplifier Turn-On |
| Orange | Illumination/Dimmer |
| White (+), White/Black (–) | Front Left Speaker |
| Gray (+), Gray/Black (–) | Front Right Speaker |
| Green (+), Green/Black (–) | Rear Left Speaker |
| Purple (+), Purple/Black (–) | Rear Right Speaker |
Making the Connections
Follow these steps for each wire pair:
- Strip about ½ inch of insulation from the end of each wire.
- Match the wires by color: the stereo's wire to the corresponding wire on the adapter harness.
- For a reliable connection, twist the wires together and secure with a butt connector using a crimping tool.
- For the most professional and durable result, solder the connection and cover it with heat shrink tubing.
- Wrap each finished connection with electrical tape for added protection.
Handling Special Wires
- Blue/White remote wire: Only connect this if you're installing an external amplifier. If you're not, cap it off and tape it—do not let it touch any other wire.
- Orange illumination wire: Connect this if you want your stereo's display to dim when you turn on your headlights.
- Steering wheel controls: If your car has buttons on the steering wheel, you'll need a separate adapter module. These connect between your car's wiring and the new stereo, preserving your ability to adjust volume and change tracks.
Common Wiring Mistakes to Avoid
- Twisting wires and using tape alone: This is unreliable and can lead to intermittent sound or power loss. Use proper connectors.
- Connecting power wires without checking: Always verify the yellow (constant) and red (switched) wires are connected to the correct sources.
- Skipping the ground wire: Without a solid ground, your stereo won't power on at all. Ensure the black wire is securely attached to a clean metal chassis point.
Installing the New Stereo
With the wiring complete, you can install the unit into the dash.
Attach the Mounting Sleeve and Dash Kit
Most aftermarket stereos come with a metal mounting sleeve. Slide the sleeve into the dash kit and bend the tabs outward to secure it. Then attach the dash kit to the stereo unit itself, following the instructions included with your kit. This assembly ensures a snug, clean fit.
Plug In the Wiring and Antenna
Connect the wiring harness adapter (now joined to your stereo's harness) to the car's factory plug. Then connect the antenna adapter and any other cables, such as:
- USB extension cable
- Bluetooth microphone
- Backup camera input
Route these cables neatly behind the dash, using zip ties to bundle them and keep them away from moving parts.
Test Before Final Assembly
This step is critical. Before securing the stereo in place, reconnect the negative battery terminal and turn on the ignition. Test the following:
- The stereo powers on and off correctly
- Sound comes from all four speakers
- The balance and fade controls work properly
- Bluetooth pairs with your phone
- USB and auxiliary inputs function
- Any other features (backup camera, steering wheel controls) work
If anything malfunctions, turn off the car, disconnect the battery, and inspect your connections. It's much easier to fix a problem while the stereo is still accessible.
Secure the Stereo and Reassemble
Once everything works, turn off the car and disconnect the battery again. Slide the stereo assembly into the dash, using the screws or bolts you removed earlier to secure it. Finally, snap the trim panels back into place, ensuring all clips engage securely.
Troubleshooting Common Installation Problems
Even with careful work, issues can arise. Here's how to diagnose and fix the most common problems.
No Power to the Stereo
- Check the fuses: Inspect both the fuse in the car's fuse box and the fuse on the back of the stereo itself. A blown fuse is a common culprit.
- Verify power wires: Use a multimeter to confirm the yellow wire has constant 12V and the red wire has 12V only when the ignition is on.
- Confirm the ground: Ensure the black wire is connected to a clean, bare metal point on the car's chassis.
No Sound from Speakers
- Check speaker wiring: Make sure each speaker wire is connected to the correct terminal and that no wires are touching each other or the chassis.
- Test different sources: Try FM radio, USB, and Bluetooth to rule out a problem with a specific input.
Static or Humming Noise
- Improve the ground: The ground wire may not be making a solid connection. Move it to a different bolt or scrape away paint for a bare metal surface.
- Check antenna grounding: A poorly grounded antenna can introduce noise.
Stereo Shuts Off or Restarts Randomly
- Inspect the switched power source: The red wire may be connected to a circuit that loses power during cranking. Try connecting it to a different ignition-switched source.
- Check for voltage drops: Use a multimeter to ensure the stereo is receiving steady voltage.
Features Like Bluetooth or USB Not Working
- Check all connections: Ensure the USB cable and microphone are securely plugged into the back of the unit.
- Update firmware: Check the manufacturer's website for any available firmware updates that might fix bugs.
Advanced Tips for a Professional Result
These details separate a clean installation from an amateur one.
Solder Your Connections
While crimp connectors are acceptable, soldering creates the strongest, most reliable wire joint. It prevents corrosion and ensures a solid electrical path. Cover each solder joint with heat shrink tubing for a tidy, insulated finish.
Secure All Wiring
Loose wires can cause rattles, get pinched by moving parts, or chafe against sharp metal edges. Use zip ties to bundle wires together and fasten them to existing harnesses or brackets. This prevents future problems and makes the installation look professional.
Consider Upgrading Your Speakers
A new stereo will improve sound quality, but your factory speakers may still be a weak link. In many cases, the factory speakers are the limiting factor in audio quality. Upgrading to aftermarket speakers can dramatically improve clarity and bass response. For more guidance on maintaining your car's interior, you might find advice on keeping your car's cabin clean helpful after a messy installation.
Store the Factory Stereo
Keep your original head unit in a safe place. If you sell your car in the future, some buyers prefer the original equipment, and reinstalling it can increase your car's resale value.
Adding Extra Features
Modern stereos can do much more than play music. Here's how to integrate popular upgrades.
Bluetooth Microphone
Most Bluetooth stereos include a small external microphone. For clear hands-free calls, mount it on the A-pillar or near the rearview mirror. Run the wire behind the trim panels for a clean, hidden installation.
Backup Camera
Many double DIN stereos support a backup camera. You'll need to run the video cable from the camera at the rear of the car to the stereo at the front. Connect the camera's power wire to the reverse light circuit so it activates automatically when you shift into reverse.
Steering Wheel Control Adapter
If your car has audio controls on the steering wheel, you'll need a specialized adapter to maintain that functionality. These modules connect between your car's wiring and the new stereo, translating the steering wheel button signals into commands the stereo understands.
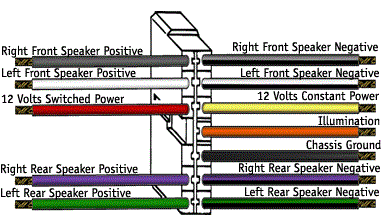
The wiring harness adapter is the key to a clean, reversible installation.
Example Installation: A 2012 Honda Civic
To illustrate the process, here's a step-by-step walkthrough for a common vehicle.
Step 1: Gather Tools and Parts
- Double DIN stereo with Bluetooth
- Honda-specific wiring harness adapter
- Honda dash kit
- Antenna adapter
- Panel removal tools and screwdrivers
Step 2: Disconnect the Battery
Remove the negative terminal as described in the safety section.
Step 3: Remove the Old Stereo
- Pry off the dash trim around the stereo using panel tools.
- Remove the screws holding the factory unit.
- Pull out the stereo and unplug all connectors.
Step 4: Wire the Harness
- Match and connect the stereo wires to the Honda harness adapter.
- Solder or crimp each connection, then cover with heat shrink.
- Plug the antenna adapter into the new stereo.
Step 5: Test the Stereo
- Connect the wired harness and antenna to the new stereo.
- Reconnect the battery and turn on the ignition.
- Test power, sound, Bluetooth, and all input sources.
Step 6: Mount the Stereo
- Attach the dash kit to the stereo.
- Slide the assembly into the dash and secure it with screws.
Step 7: Reassemble the Dash
- Snap the trim panels back into place.
- Confirm everything fits and functions correctly.
This process is similar for most vehicles, though specific steps may vary. Always consult your vehicle's wiring diagram.
When to Call a Professional
While most DIYers can handle a stereo installation, some situations warrant professional help:
- Your car has a factory-installed amplifier or premium sound system with complex electronics.
- You're not comfortable working with electrical wiring.
- You encounter persistent problems, such as electrical noise or compatibility issues.
Professional installers have specialized tools and experience to handle complex vehicles. They can also troubleshoot issues that might not be obvious to a beginner.
Frequently Asked Questions
How Long Does It Take to Hook Up a Car Stereo?
A typical installation takes 1 to 3 hours. Plan for extra time if you're a beginner. The most time-consuming parts are carefully removing trim panels and making solid wire connections.
Do I Need to Disconnect the Battery Before Starting?
Yes, absolutely. Always disconnect the negative battery terminal before touching any wires. This prevents short circuits and protects both you and your car's electronics.
What If My New Stereo Doesn't Fit My Dash?
You likely need a dash kit designed for your specific car and stereo size. These kits fill the gap around the unit and provide mounting points for a factory-like fit. You can find them at most car audio retailers.
Can I Keep My Steering Wheel Controls?
In most cases, yes. You'll need a steering wheel control adapter that's compatible with both your car and your new stereo. This adapter preserves your ability to control volume, tracks, and calls from the wheel.
Why Does My New Stereo Have No Sound?
The most common causes are incorrect speaker wiring, a missing ground connection, or a blown fuse. Double-check all connections and test each speaker individually if necessary.
Conclusion
Installing a new car stereo is a rewarding project that dramatically improves your driving experience. By following this step-by-step guide, you can achieve professional results without the expense of a shop installation. The keys to success are careful planning, using the right adapters, making solid wire connections, and always testing before final reassembly.
Your next step is to gather the tools and parts specific to your vehicle, then follow the sequence outlined here. Take your time, work methodically, and you'll be enjoying your new sound system in no time. For more tips on getting the most from your car, explore our automotive blog for guides on everything from maintenance to upgrades.

Leave a Reply